Purchase & Supply Chain Management
How to Create a new vendor.
1.Log in to the ERP with a user account which has access to the contact module. 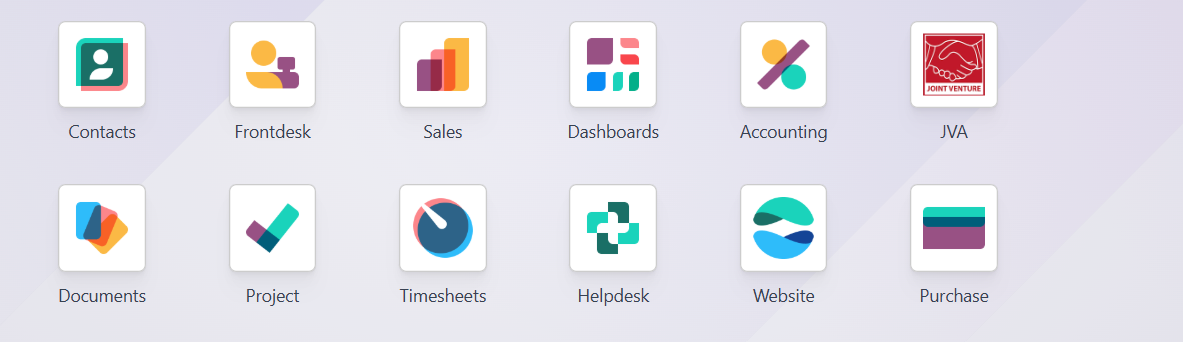
2.Click on New
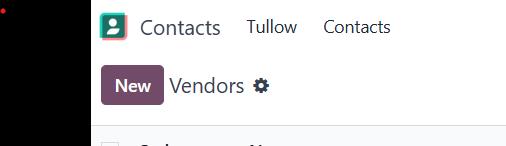
3. This opens a new contact with the required fields as follows:
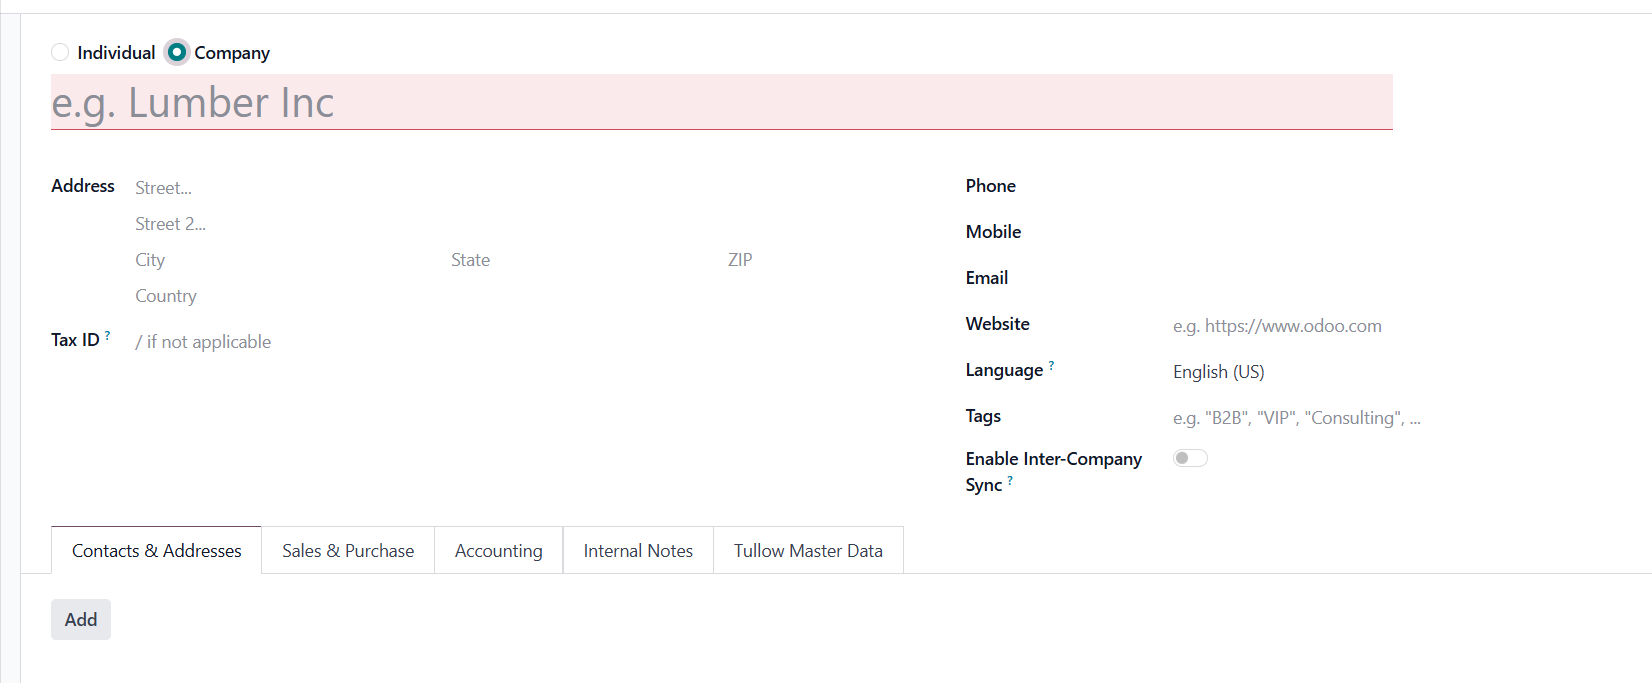
a). Select Contact Type: -Choose Company if the contact is a business and choose Individual only if the contact is a person.
b). Enter Company Name: In the name field, enter the registered company name also ensure the name is correct as it will appear on all official documents.
c). Enter Address Details.
Fill in the Street address.
Add Street 2 if additional address details exist.
Enter the City.
Enter the State/County if applicable.
Enter the ZIP/Postal Code.
Select the Country.
d). Enter Tax Information: In the Tax ID field, enter the company’s tax ID.
e). Enter Communication Details
Enter the Phone number.
Enter the Mobile number.
Enter the Email address used for official communication.
Enter the Website if available.
f). Select Language: Choose the preferred document language for the vendor.
g). Add Tags (Optional).
h). Inter-Company Sync (If Applicable).
i). And save.
4. On contacts and addresses click Add
5.Onclick Add contact it opens the following fields.
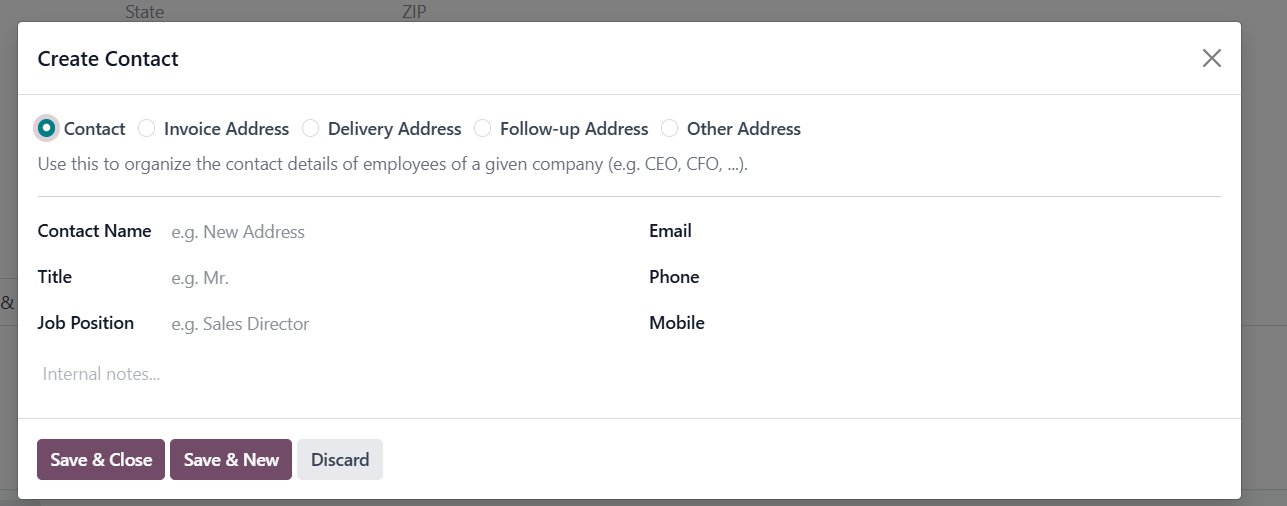
Select "Contact": Ensure the radio button for Contact is active at the top of the window.
Verify Purpose: This mode is designed to organize details for employees like the CEO, CFO, or department heads.
Contact Name: Type the full name of the person in charge
Title: Select or enter the person's formal salutation.
Job Position: Define their specific role.
Email: Enter the individual’s direct work email address.
Phone: Provide their primary office or desk phone number.
Mobile: Add a personal or company mobile number for urgent contact.
Internal Notes: Use the text area at the bottom to record private details, such as communication preferences or specific notes for your team.
Save and close
6.Under Sales and Purchasing fill in the company ID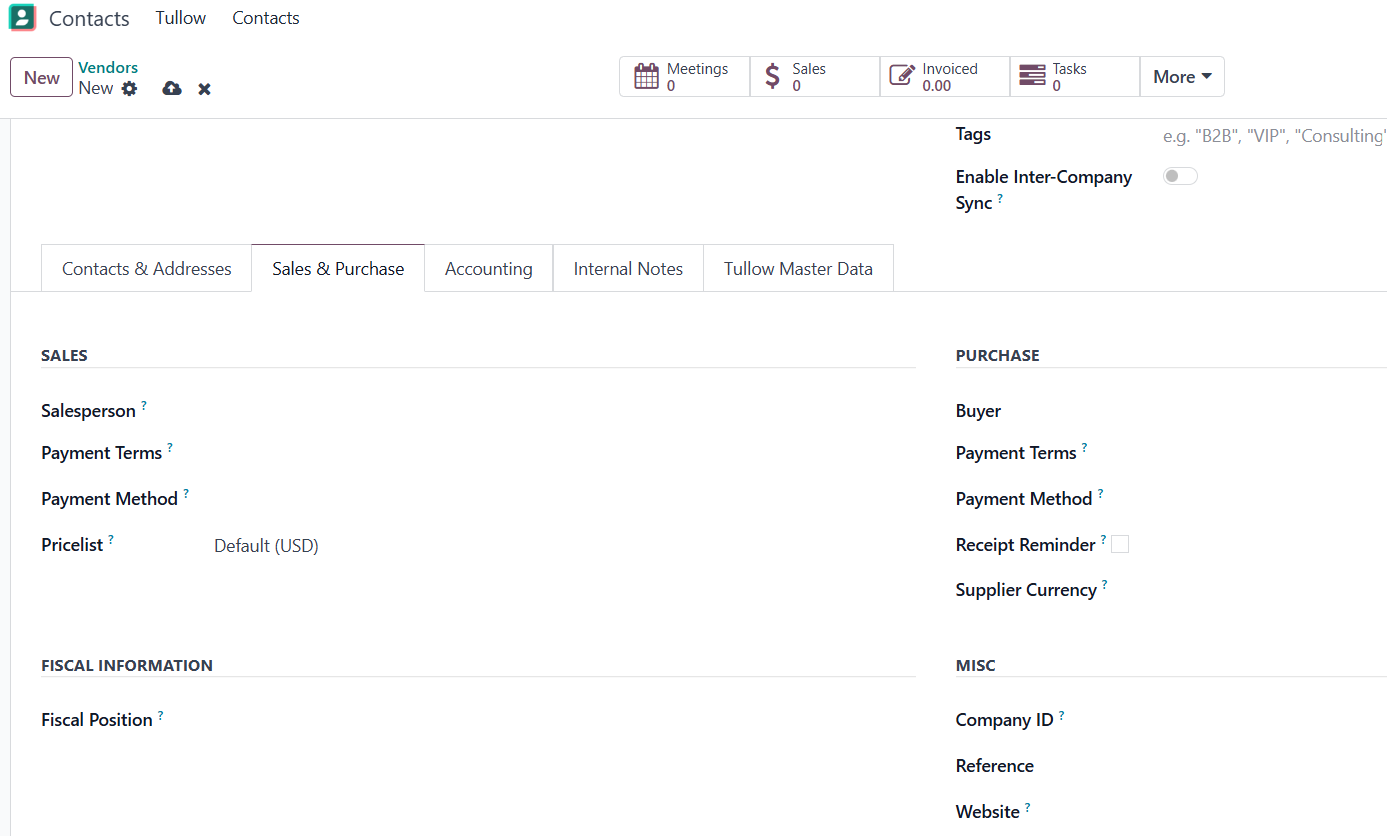
How to fill in the Vendor's Banks Accounts.
- Open the accounting tab and add line.
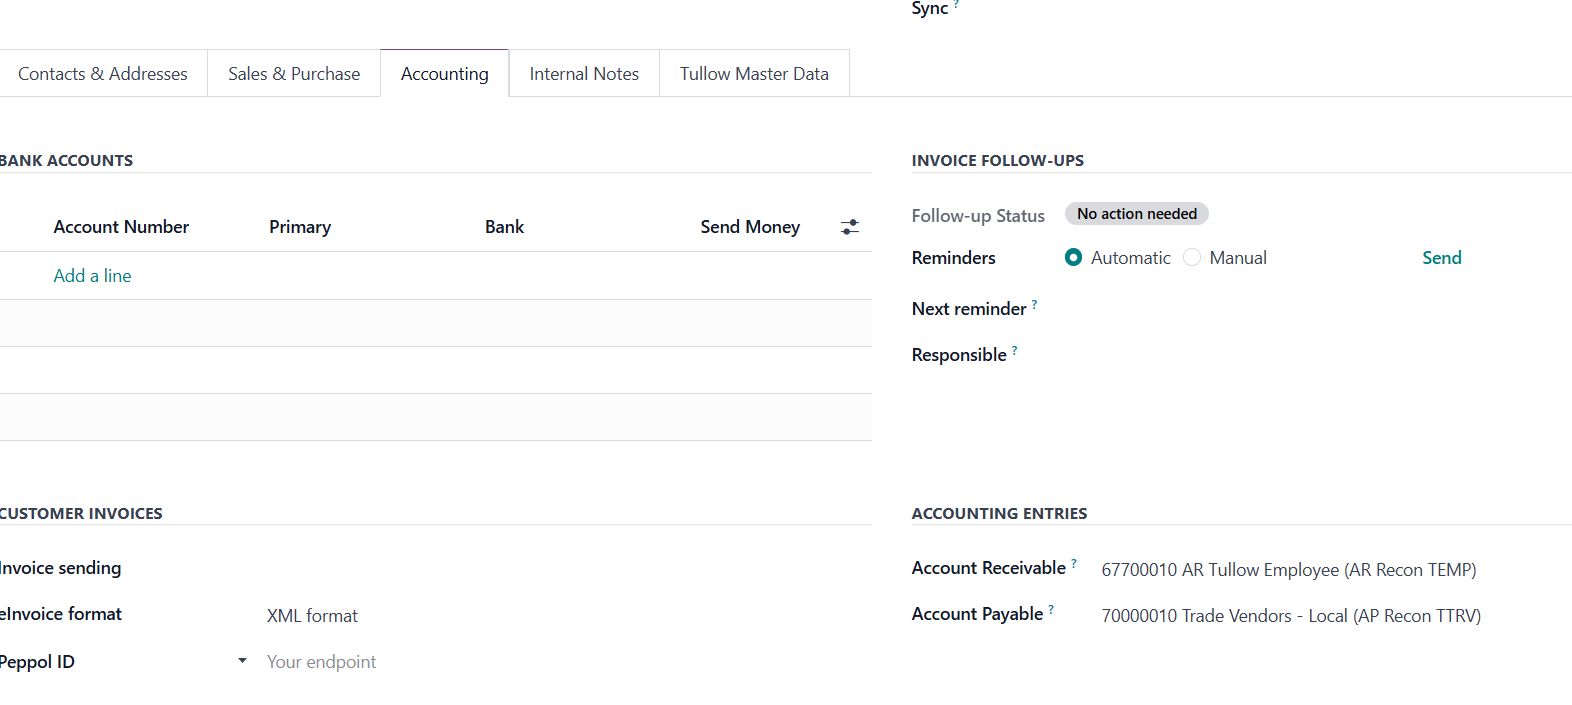
2. Upon adding a line this are the fields you should fill in to create a bank account for the vendor.
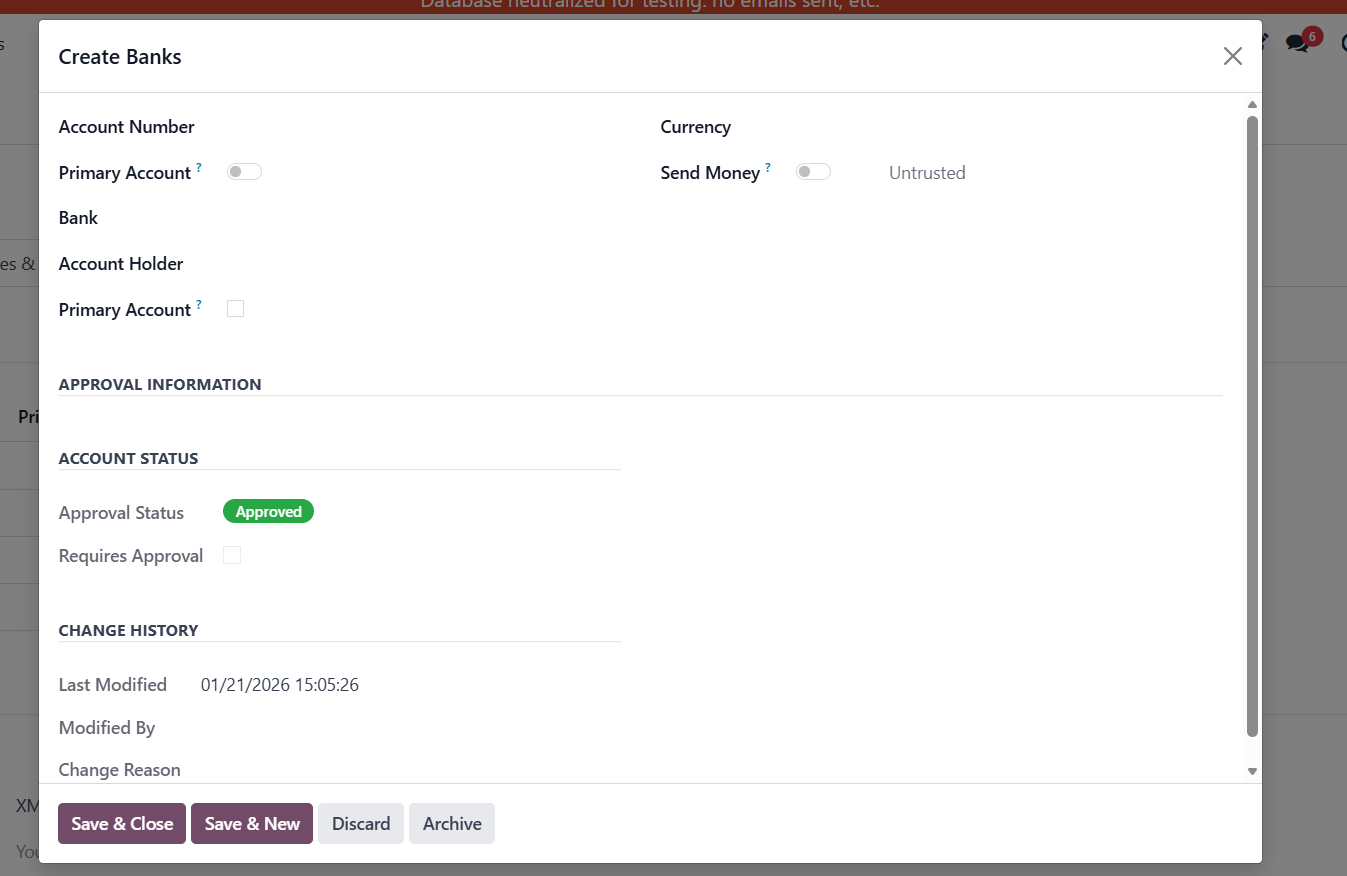
a). Account Number: Enter the full bank account number.
b). Currency: Select the functional currency for this account either in USD or KES or any other.
c). Bank: Select the specific banking institution from the dropdown.
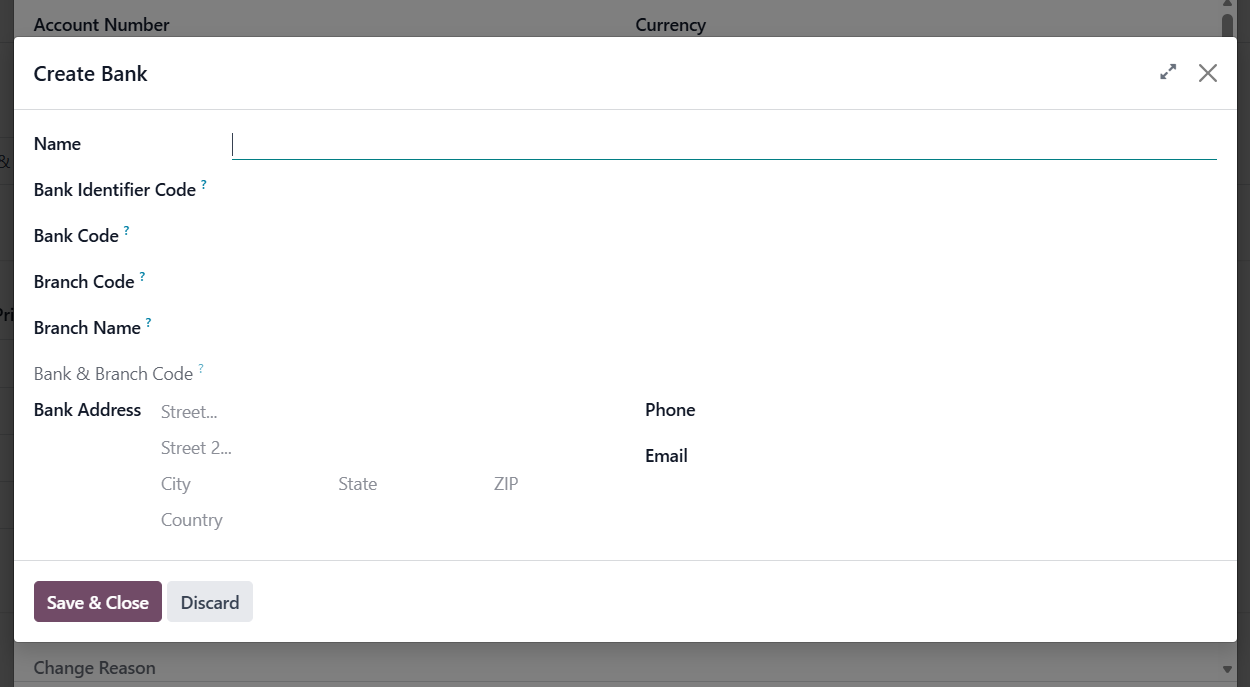
d). Ensure that the bank selected has the same address if not, create a new one with your provided by:
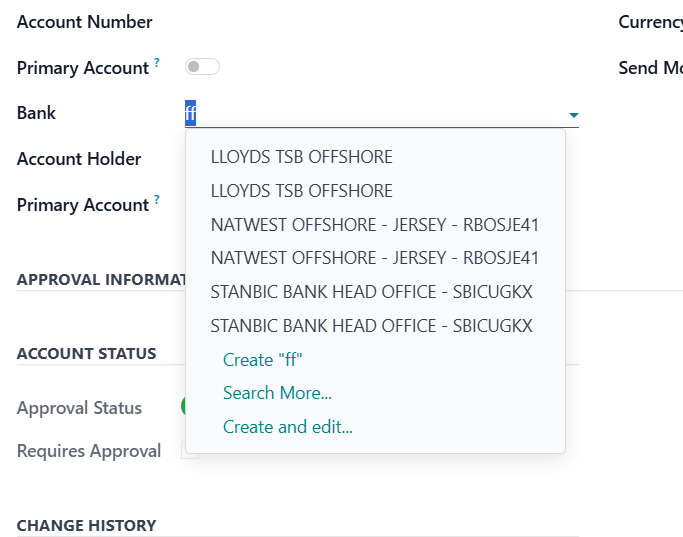
d.i)Fill in the Bank details on this particular window and save and close.
e). Account Holder: Enter the name of the person or entity who owns the account.
f). Send Money: Toggle this to enable or disable outgoing payments.
g). Check the Approval Status section to ensure the account is marked as Approved before attempting transactions.
h). Click Save & Close to save the bank details.
How to upload the vendors documents.
- Ensure that you have all the vendors documents saved in your locals with the appropriate vendor's name.
- .Log in to the ERP with a user account which has access to the contact module.
3.Navigate to the contacts, select and open the intended vendor in this case i have used Abell Geospatial ltd.
4. Upon opening on the top menu. click more.
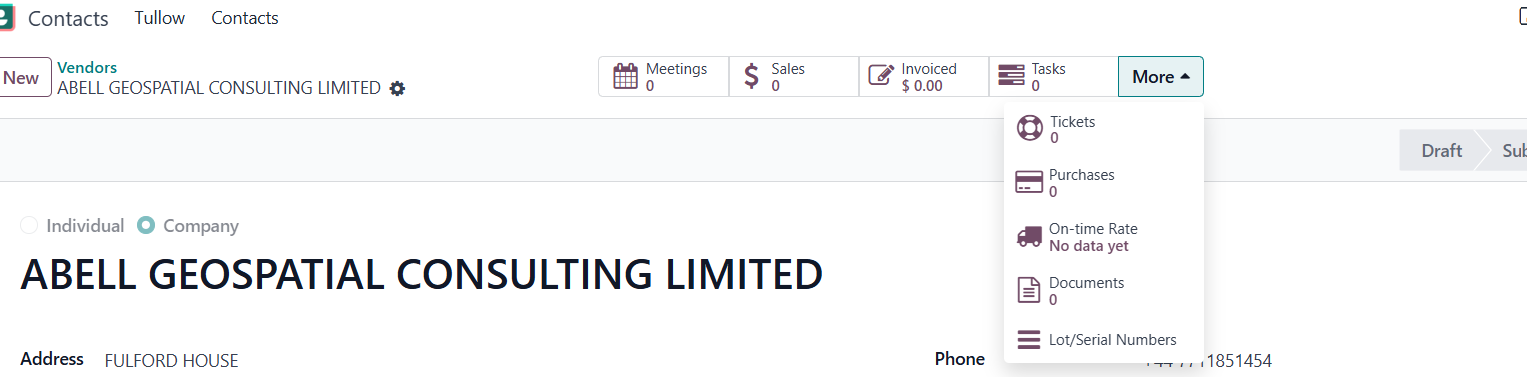
5.select documents.
6. Click New and select upload.
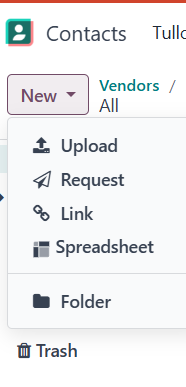
7. Select the vendors documents from your local and upload.
How to Indicate that it is a vendor not a customer.
1.Log in to the ERP with a user account which has access to the contact module.
2. Navigate to the contacts, select and open the intended vendor.
3. On the tabs, click on Tullow Master Data.
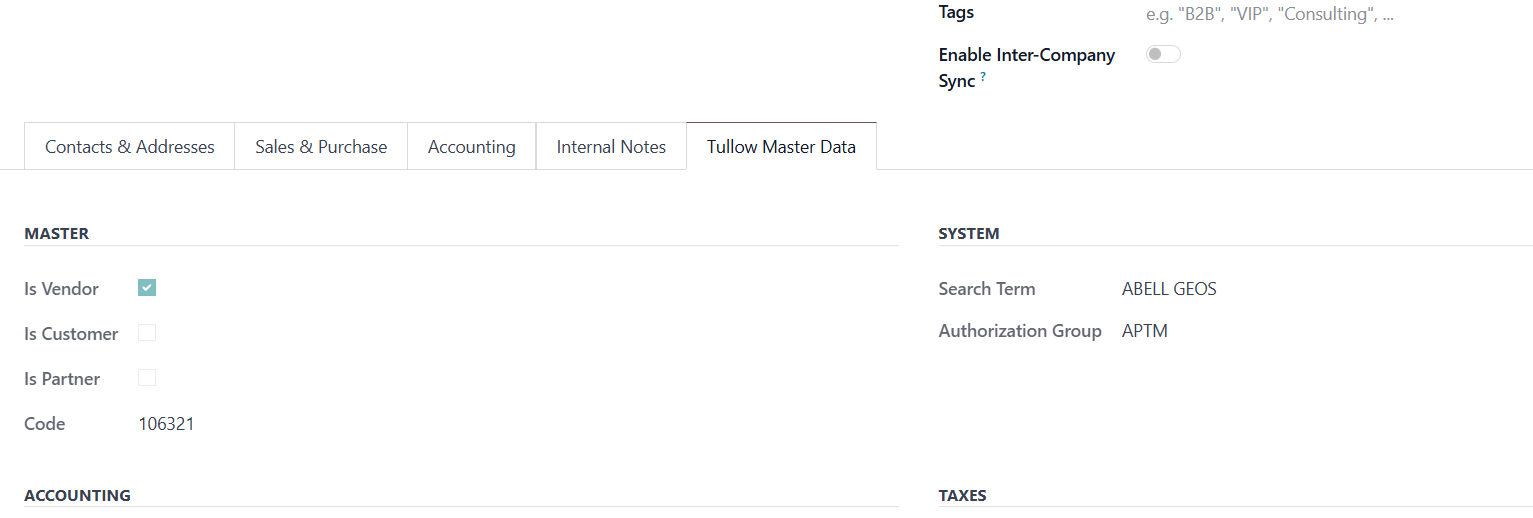
4.Check on Is a vendor. Or if it is checked already then it is a vendor.
How to include Vendor Category.
1.Upon Indicating if the contact is either a vendor or a customer an error ocuurs which is vendor category needs to be input.
2.Navigate to ales and Purchase Tab.
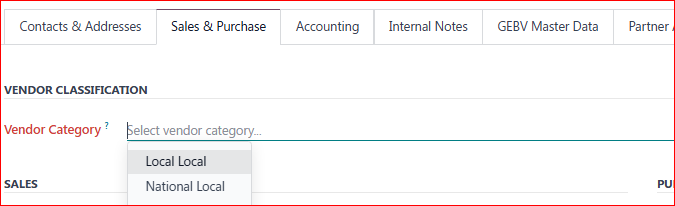
3.Select the vendor fro m the drop down given .
Validation rules the bank expects payment files to adhere to
RFQ Creation
1. Vendor bank account number: Numeric value not exceeding 16
characters; should not contain spaces.
2. Vendor name: Alphanumeric value not exceeding 35 characters;
should not contain special characters (e.g., &, *, (, )).
3. Vendor bank and branch code (sort code): Numeric value not
exceeding 5 characters.
4. Paying account(Account number from the payment journal): Numeric
value not exceeding 10 characters.
5. Currency code: 3-letter text value.
6. Amount: Numeric value not exceeding 16 characters
How to create a new RFQ
- Log in to the ERP with a user account which has access to the Purchase module
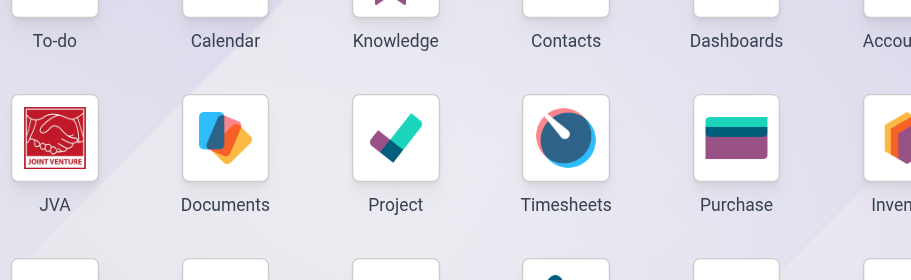
- Open Purchase module and click 'New'
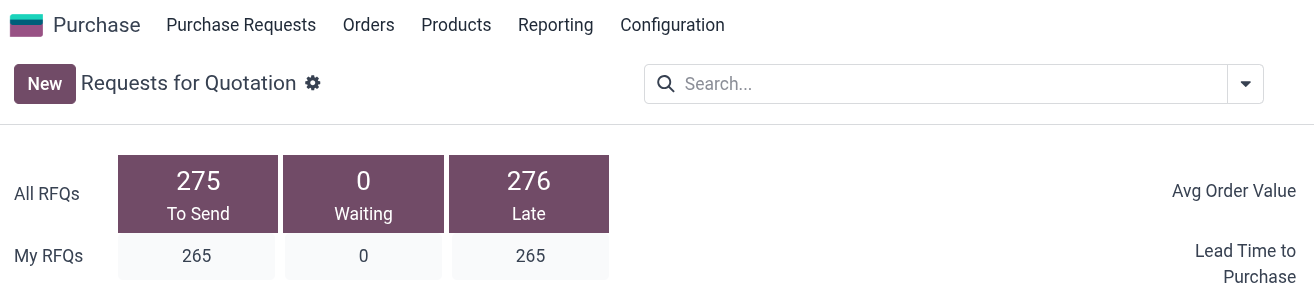
- This opens the create new RFQ, with the required field being the vendor's name and additional fields as follows:
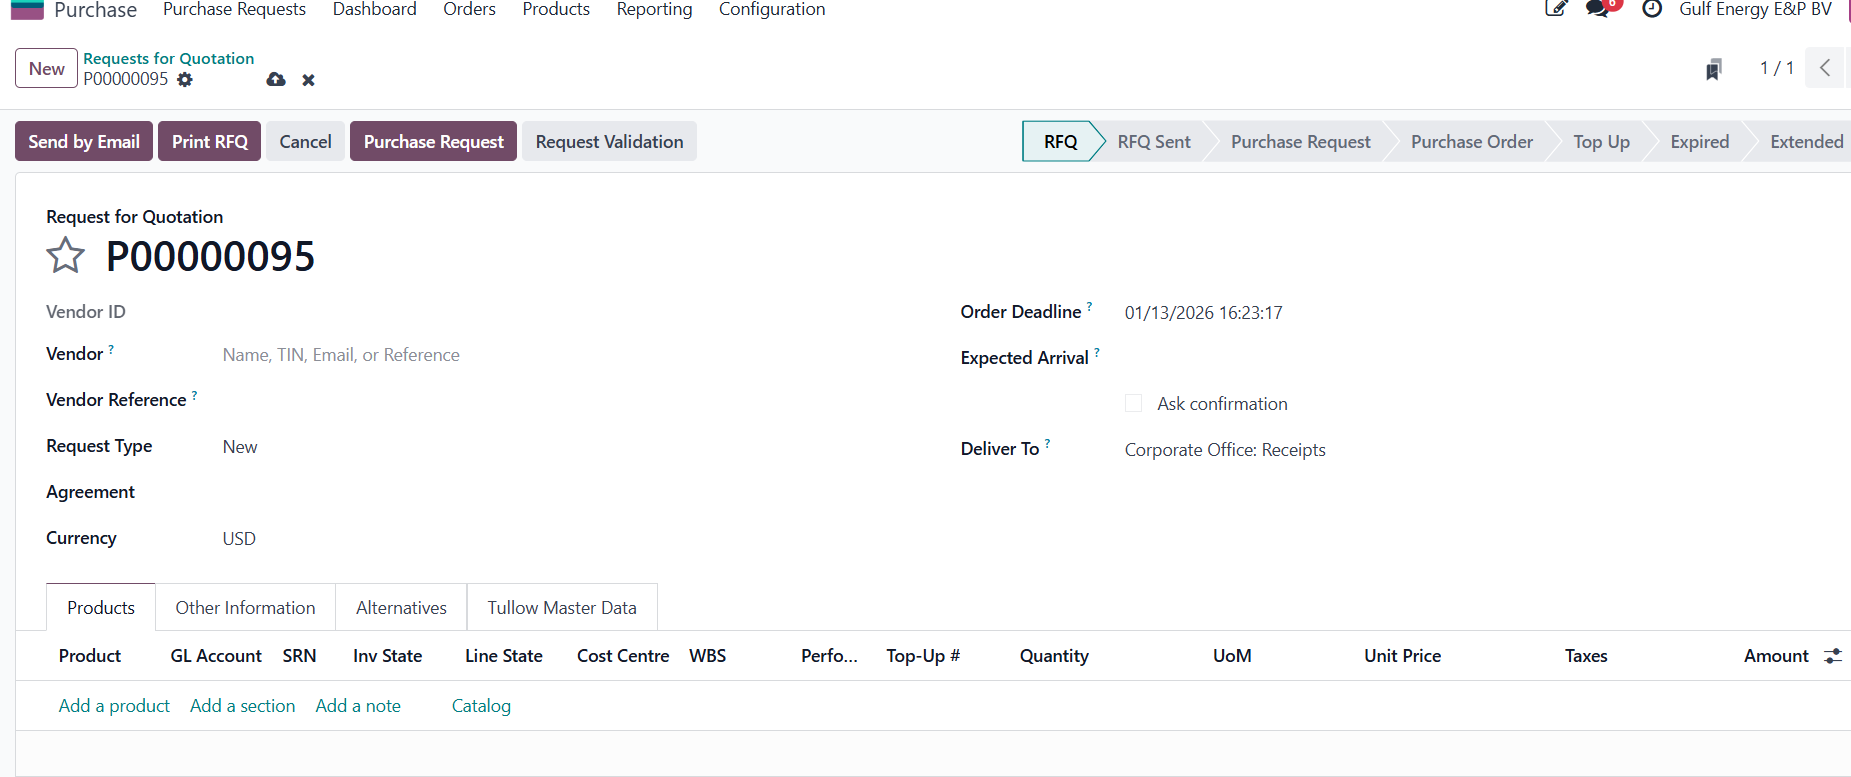
- Vendor Name: Select vendor name from the drop down, this automatically fills the vendor ID from the system
- Order Deadline: The system will always have this as current date and time but this can be changed to any desired date and time
- Expected Arrival: This is the date and time that you expect the vendor to deliver the goods, or services - leave blank for system to automate based on past delivery times of the vendor.
- Vendor Reference: Input the reference from the vendor if available else leave this blank
- Request type Must be New Used when this is a first-time request, no previous order, contract, or budget exists
- Agreement: If there exists a Purchase agreement with the vendor for blanket orders this can be selected here
- Deliver To: Should be the warehouse where delivery will be done to, by default is the Corporate Office Receipts
- Currency is the currency of the order, default is the company currency which is USD
- Click on the 'Add a product' link to populate the products of the RFQ.
How to send an RFQ to vendor.
1.Log in to the ERP with a user account which has access to the Purchase module.
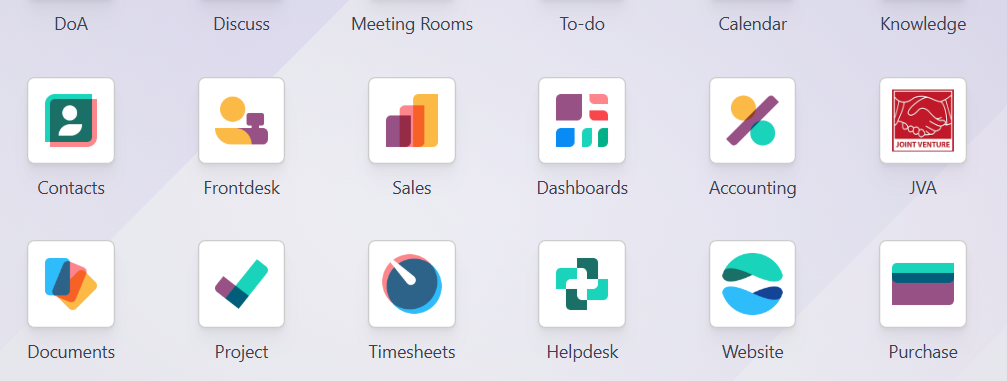
2.Under purchase Requests. Select Request Quotation. 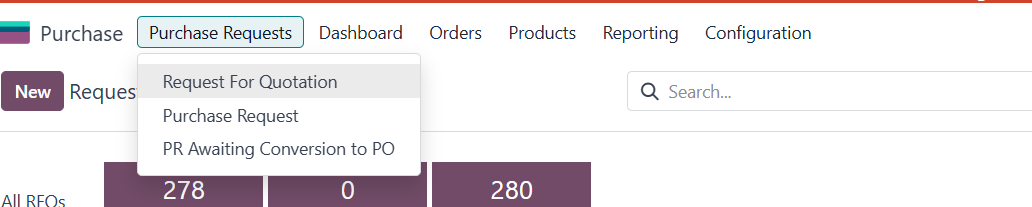
3.Filter to RFQs
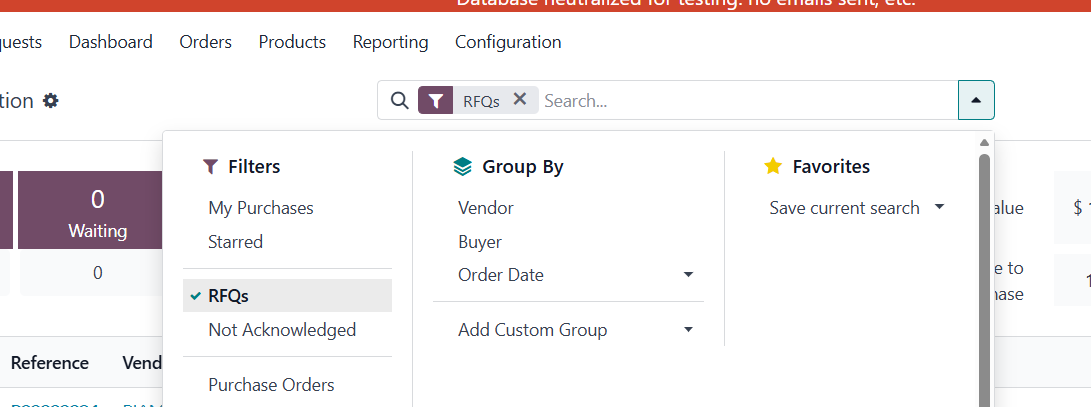
4.Select/Search from the list of RFQs the required RFQ to be sent and open it.
5.Click on send by email.
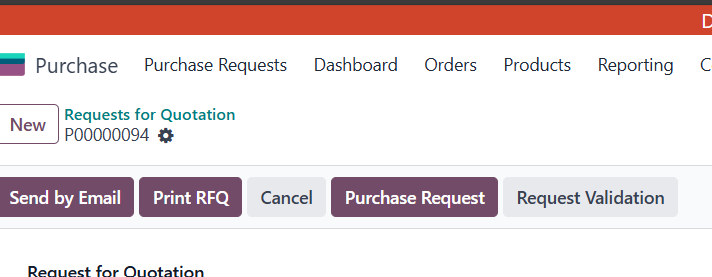
6.Click on Send by email and its shows the fields as follows: 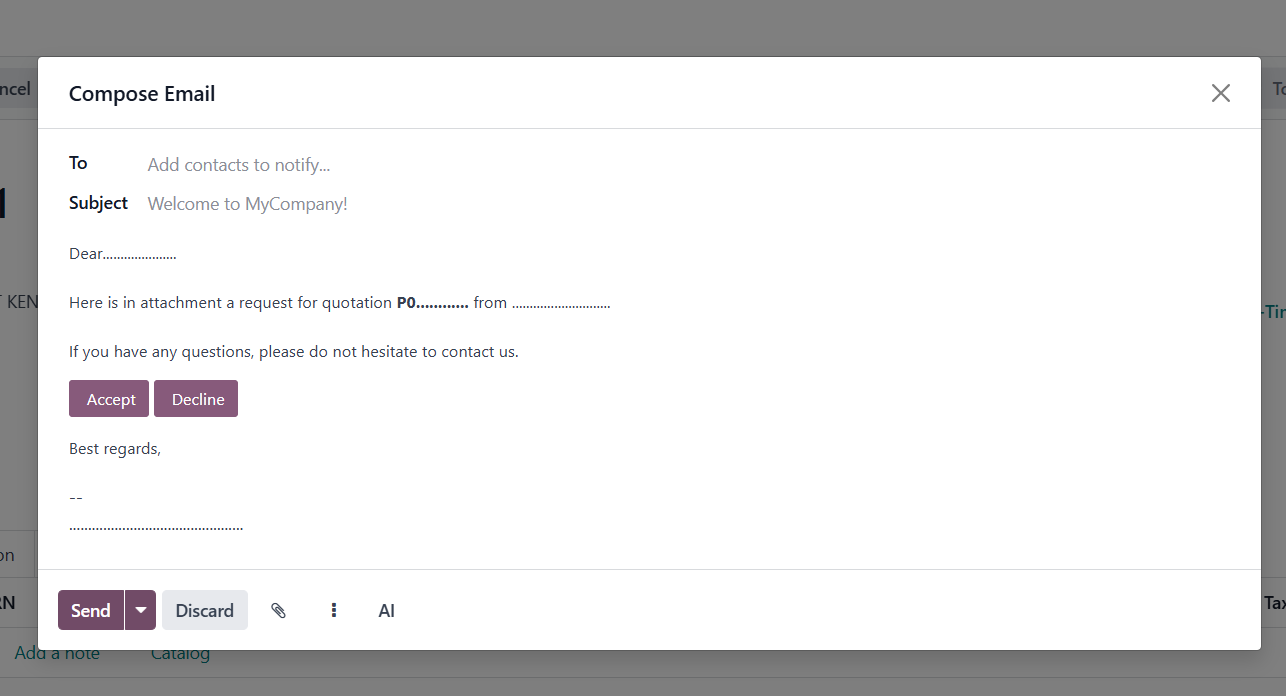 To: This is where you select the recipient. You can add multiple contacts from your database or type in a new email address.
- Subject: The title of your email as it will appear in the recipient's inbox. Odoo often pre-fills this based on the document you are sending (e.g., "Welcome to My Company!").
- Message Body: The main area where you write your message. It currently shows a template for a Request for Quotation (RFQ), including dynamic placeholders like "P0..." for the order number.
- Accept / Decline Buttons: These are call-to-action buttons embedded in the email that allow the vendor to respond directly via the Odoo portal.
Icons
-Send: Finalizes and emails the message to the recipients.
- Attachment: Found in the main record view (behind the popup). It allows you to attach physical files, like a scanned copy of a bank receipt or a PDF of the bill.
-Templates: Click this to switch between different pre-written email templates.
- Discard: Closes the window without saving or sending the draft.
How to convert an RFQ to PR.
- Log in to the ERP with a user account which has access to the Purchase module
- Under purchase Requests. Select Request Quotation.
- Select/search the RFQ you want to convert to a PR
- Click on purchase request.
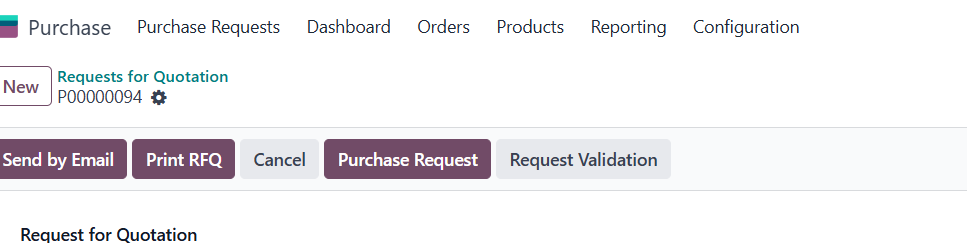
5. This opens the PR with the required field being the PO and additional fields as follows:
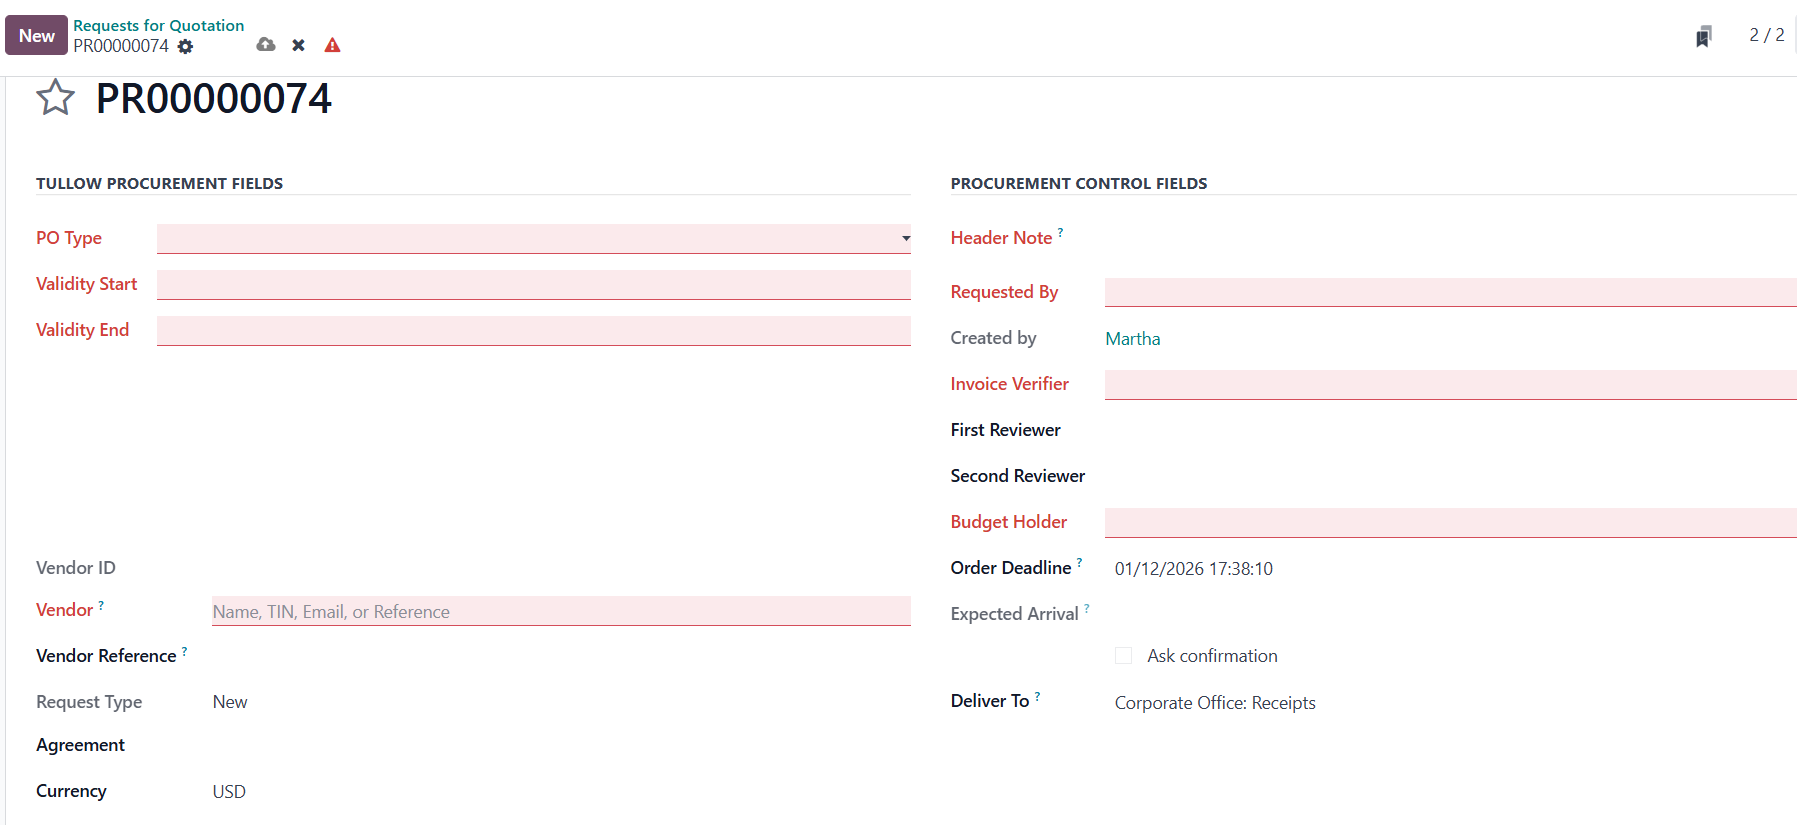
a). PO Type: indicates the nature of the purchase. e.g. Goods Purchase Order. And determine applicable workflows, stock handling, and accounting treatment.
b). Validity Start: Date from which the quotation or request becomes valid. Before this date, the RFQ cannot be confirmed. It helps control when a supplier quotation is acceptable.
c). Validity end: Expiry date of the request. If the RFQ is not confirmed before this date, Odoo can prevent confirmation or require a new RFQ.
d). Vendor ID: Internal system identifier for the supplier. It ensures all purchases, bills, and payments are correctly linked to the same vend
e). Vendor: Name of the supplier being requested or evaluated.
f). Request type: Indicates whether the request is: New – first-time purchase or Replacement / Amendment – modifying an earlier request.
g). Agreement: Links the RFQ to a Purchase Agreement / Call for Tender. Once selected, Odoo automatically loads:
Vendor pricing
Payment terms
Vendor currency
Vendor taxes (if configured)
h). Currency: Currency in which the vendor will quote. Odoo automatically handles currency conversion for accounting and reporting.
i). Header Note: General instructions or comments. The note can be printed on the RFQ or Purchase Order sent to the vendor.
j) Requested by: Person who initiated the purchase request
k). Created by: User who physically created the document in Odoo. Odoo uses this for traceability and approval routing.
l). Invoice Verifier: Person responsible for verifying the vendor invoice. This person is responsible for checking the vendor invoice against: The Purchase Order, Delivered Quantities, agreed prices. Odoo may require their approval before payment is processed.
m). First Reviewer: First level approval authority
n). Second Reviewer: Second approval level (usually management or finance)
o) Budget Holder: Person responsible for the budget being used
p). Order Deadline: Latest date the order must be confirmed
q). Expected Arrival: Expected delivery date of goods
r). On-Time Delivery: Vendor performance indicator
s). Ask confirmation: If checked, vendor must confirm the order, Ensures commitment before fulfillment
t). Delivery To: Physical delivery location. This specifies where goods or services should be delivered.
Odoo uses this to determine: The warehouse, Stock location, Delivery documentation
u). Then proceed to validation.
How to convert a PR to a PO.
1.Log in to the ERP with a user account which has access to the Purchase module 
2. Navigate to Purchase Request and Select PR Awaiting Conversion to PO.
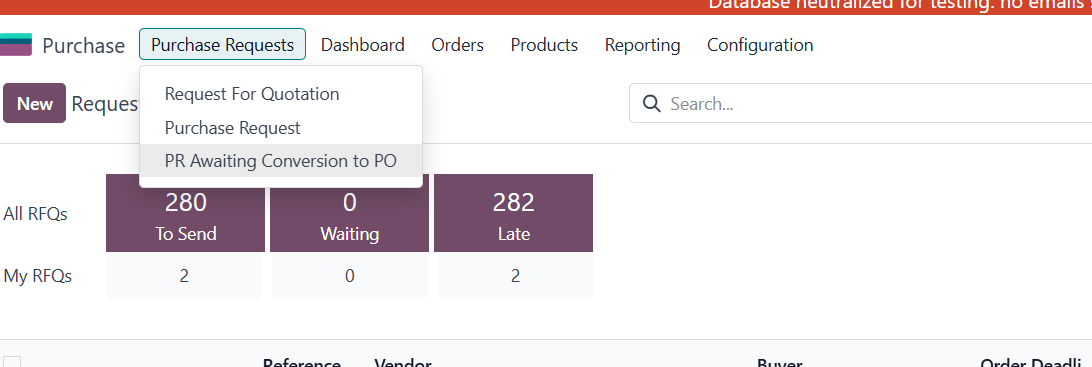
3.Open the PR to be converted to a PO.
4.Once you've opened the PR, click on confirm order. 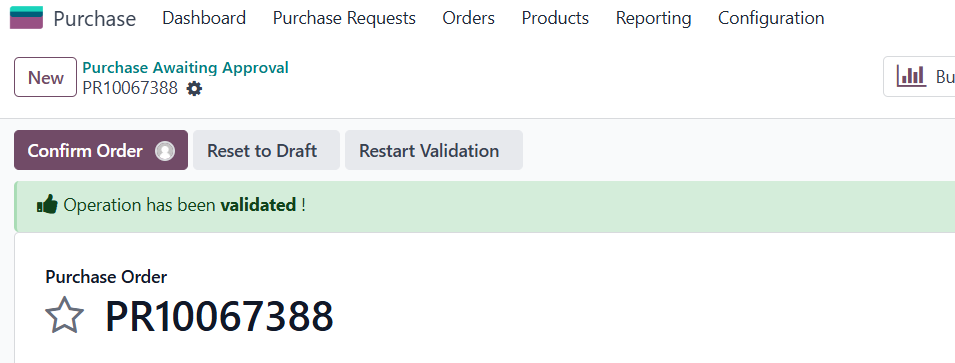
5.Once it is Confirmed, it automatically sets to PO.
6.Under Purchase >orders>purchase orders is where you'll find the PO That you've converted.
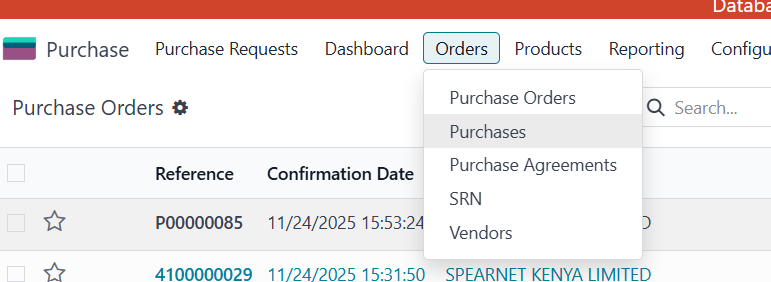
7.Click your PO to open it.
How to create an extension PO.
- Log in to the ERP with a user account which has access to the Purchase module
- Open Purchase module and click 'New'
- This opens the create new RFQ, with the required field being the vendor's name and additional fields as follows:
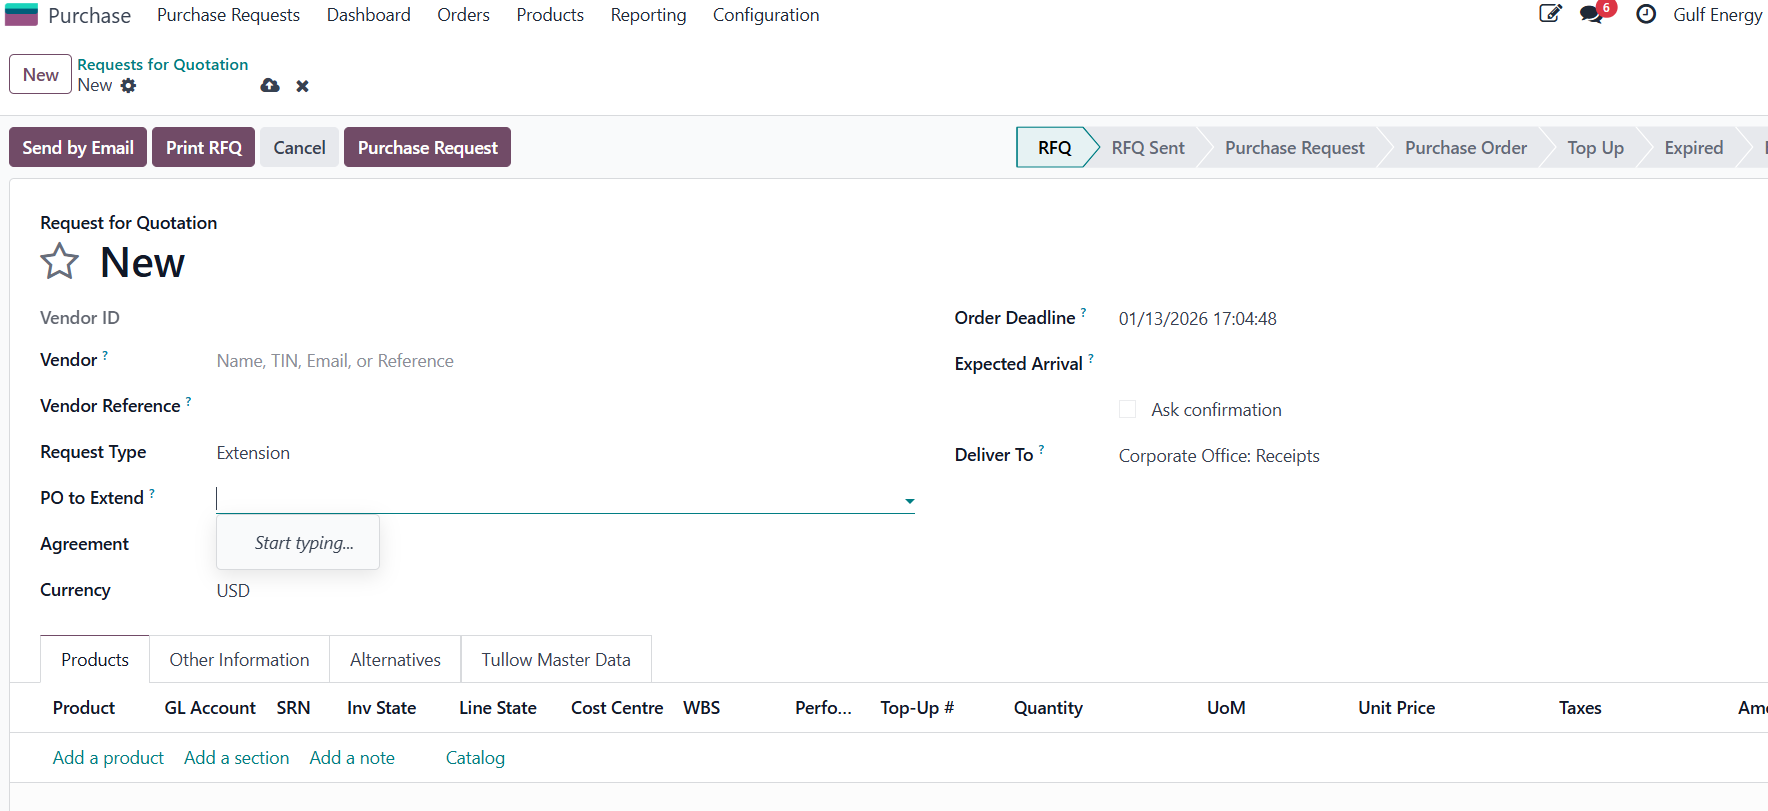
a). Vendor Name: Select vendor name from the drop down, this automatically fills the vendor ID from the system
b). Order Deadline: The system will always have this as current date and time but this can be changed to any desired date and time
c). Expected Arrival: This is the date and time that you expect the vendor to deliver the goods, or services - leave blank for system to automate based on past delivery times of the vendor.
d). Vendor Reference: Input the reference from the vendor if available else leave this blank
e). Request type Must be Extension-Used when you are extending the duration of an existing request or contract. No change (or minimal change) in quantity or amount just time Example: Extending a service contract for 3 more months, Renewing a lease or maintenance agreement.
f). Extension PO- Input/select a PO that must be affected.
g). Agreement: If there exists a Purchase agreement with the vendor for blanket orders this can be selected here
h). Deliver To: Should be the warehouse where delivery will be done to, by default is the Corporate Office Receipts
I). Currency is the currency of the order; default is the company currency which is USD
9. Click on the 'Add a product' link to populate the products of the RFQ.
PO Extension Approval
Overview
When a Purchase Order passes its validity end date, it moves to Expired state. To reactivate it, a requester submits an extension request to a designated Supply Chain Manager (SCM), who can approve, reject, or ask for more information before deciding.
The Extension menu in the Purchase app gives both requesters and approvers a quick view of where every expired PO stands.
Extension States
State | What It Means | Who Acts Next |
Expired | PO validity has passed. No goods/services can be received. | Requester |
Pending Approval | Extension request submitted, awaiting approver decision. | Approver |
More Info Requested | Approver needs clarification before deciding. | Requester |
Approved | Extension granted. PO restored to active state. | — |
Rejected | Extension denied. PO remains expired. | Requester (re-submit or close) |
For Requesters
A requester is any Purchase user who needs to extend an expired PO.
Step 1 — Find the expired PO
● Go to Purchase Module → PO Extension (Top Menu) → Expired POs.

● Open the PO you want to extend.
Step 2 — Fill in the Extension Request section
The Extension Request section is visible on the form whenever a PO is expired. Fill in all three fields:
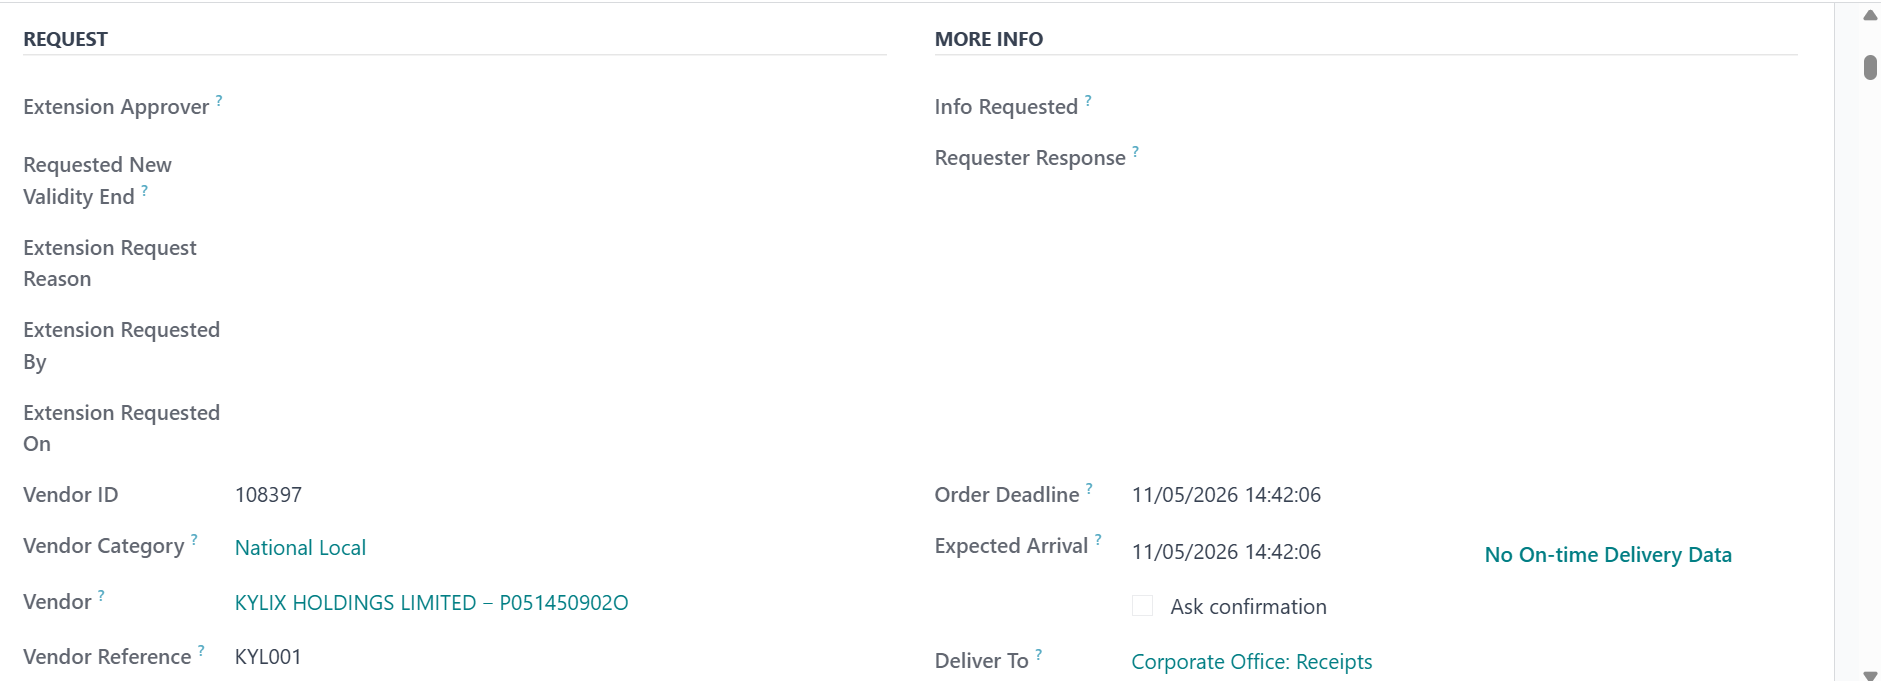
● Approver: Extension Approver
● New Validity End: The new validity end date (must be in the future).
● Reason: Why is the extension needed.
Note: The Request Extension button only appears once all three fields are filled in. |
Step 3 — Click Request Extension
● The approver receives an email with a direct link to the PO and an additional notification on the sytem.
● The form banner changes to "Extension Pending Approval."
● You will be notified by email and on the system once the approver decides.
If More Info is Requested
● You will receive an email with the approver's question.
● Open the PO, enter your response in the Requester Response field.
● Click Submit Response. The request returns to Pending Approval.
For Approvers (Supply Chain Managers)
You will only see the Extension Request section on a PO once a request has been submitted — it is not visible to you while there is no pending request.
Receiving a Request
● You receive an email with a direct link to the PO.
● Alternatively, go to Purchase → Extension → Pending Approval.
Reviewing the Request
On the PO form, the Extension Request section shows:
● The requested new validity end date.
● The reason provided by the requester.
Taking Action
Enter a decision reason in the Decision field, then choose one of three buttons:
● Approve — PO is restored to its previous active state. Requester is notified by email.
● Reject — PO stays expired. Requester is notified by email.
● Request More Info — Moves the request to More Info Requested state. Requester is emailed your question.
Note: A decision reason is required before any of the three action buttons will process. |
PO Extension Menu Reference
Menu Item | Shows |
Expired POs | All POs in Expired state, regardless of extension approval status. |
Pending Approval | Expired POs with a submitted request awaiting approver decision. |
More Info Requested | Requests the approver has sent back to the requester for clarification. |
Email Notifications
Trigger | Sent To | Contains |
Request Extension clicked | Approver | PO name, requested date, link to PO |
Approved | Requester | New validity end date, reason, link to PO |
Rejected | Requester | Rejection reason, link to PO |
More Info Requested | Requester | Approver's question, link to PO |
How to top-up a PO.
1.Log in to the ERP with a user account which has access to the Purchase module
2. Open the Top-Up PO go to Purchase → Orders → Purchase Orders
3. Search for the newly created Top-Up PO
4.Click to open it.
2. Check the Reference / Source Document Field Look for a field called “Source Document” or “Reference”
If the Top-Up is linked correctly, it should show:
Top-Up for PO #XXXX
#XXXX = Original PO number.
GRIR & SRIR – PURCHASE PROCESS
1. GRIR – Goods Receipt
GRIR applies to physical goods purchased through a Purchase Order.
Process
Create and confirm the Purchase Order.
Supplier delivers the goods.
Navigate to the related Goods Receipt.
Verify the quantity received against the Purchase Order.
Validate the Goods Receipt.
Once the goods are received, the GRIR process can be initiated.
The system checks all unprocessed product lines.
Lines that have already been processed, as well as section headers and notes, are skipped.
Receipt Status
No goods received: The process cannot proceed.
Full quantity received: The full received quantity is considered.
Partial quantity received: Only the received quantity is processed; the outstanding quantity remains pending.
2. SRIR – Service Receipt
SRIR applies only to service lines that are configured to require a Service Receipt.
Process
Create and confirm the Purchase Order.
Supplier provides the service.
Complete the applicable Service Receipt.
Confirm the service received against the Purchase Order.
The system checks the eligible unprocessed service lines.
Fully received services are processed in full.
Partially received services are split between the received and outstanding portions.
Processed lines are marked as Processed.
3. Purchase Process Flow
Goods
Purchase Order → Goods Receipt → GRIR
Services
Purchase Order → Service Receipt → SRIR
Framework Agreement & Call-Off Orders
End User Guide
Overview
A Framework Agreement is a long-term contract with a vendor that sets a maximum spend ceiling. Individual purchases are made against it via Call-Off Orders, which draw down the available balance until it is exhausted. The system enforces the ceiling automatically, no Call-Off Order can be confirmed if it would exceed the remaining balance.
This guide covers:
● Setting up a Framework Agreement
● Raising a Call-Off Order against it
● Understanding the balance and consumption rules
● Topping up a Framework Agreement or Call-Off Order
Key Concepts
Term | Meaning |
Framework Agreement | A confirmed PO with PO Type = Framework Agreement Order. Defines the spend ceiling for a vendor. Gets a 47-series reference number. |
Call-Off Order | A confirmed PO with PO Type = Call/Off Order. Linked to a Framework Agreement and draws down its balance. Gets a 45-series reference number. |
Agreement Value | The total tax-inclusive value of the Framework Agreement. This is the ceiling. |
Consumed Amount | Total value drawn down by all active and partially-billed expired Call-Off Orders. |
Remaining Amount | Agreement Value minus Consumed Amount. A new Call-Off cannot exceed this figure. |
Setting Up a Framework Agreement
A Framework Agreement is created and confirmed through the standard PR → approval → confirm flow.
Step 1 — Create the PO
● Go to Purchase → Requests for Quotation → New
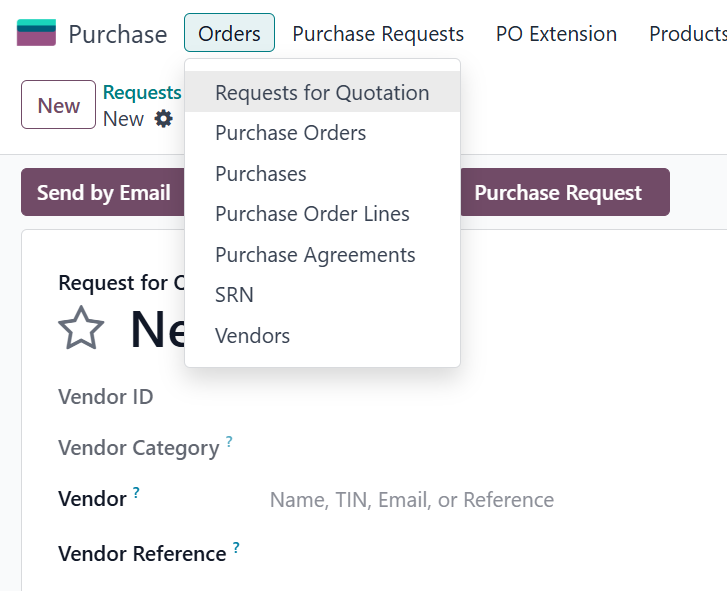
● Set PO Type to Framework Agreement Order.
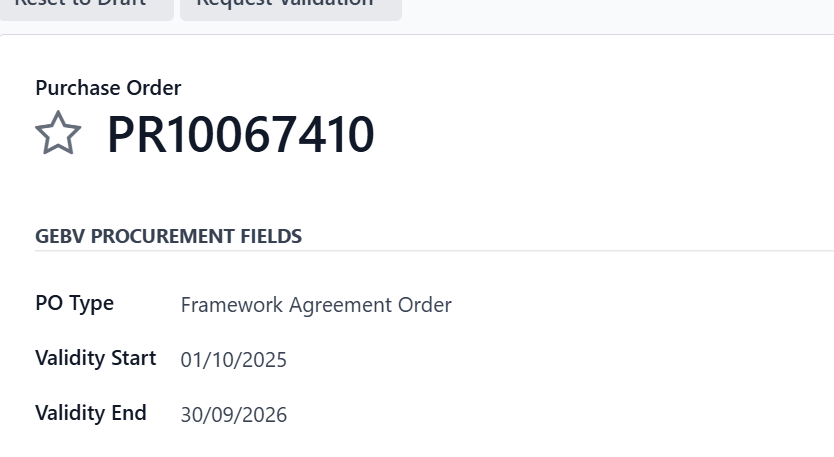
● Set the vendor, validity dates, and add the agreement lines
● The total tax-inclusive value of the lines becomes the spend ceiling
Step 2 — Submit and Confirm
● Click Purchase Request and complete the tier validation as normal
● On confirmation the PO receives a 47-series reference number (e.g. 4700000001)
Step 3 — Monitor the Balance
Once confirmed, the Framework Agreement form shows a balance summary:
Field | What It Shows |
Agreement Value | Total tax-inclusive PO value — the ceiling |
Consumed Amount | Total drawn down by confirmed Call-Off Orders |
Remaining Amount | What is still available for new Call-Off Orders |
The Call-Offs stat button (top right of the form) opens a list of all linked Call-Off Orders.
Raising a Call-Off Order
Step 1 — Create the PO
● Go to Purchase → Requests for Quotation → New
● Set PO Type to Call/Off Order
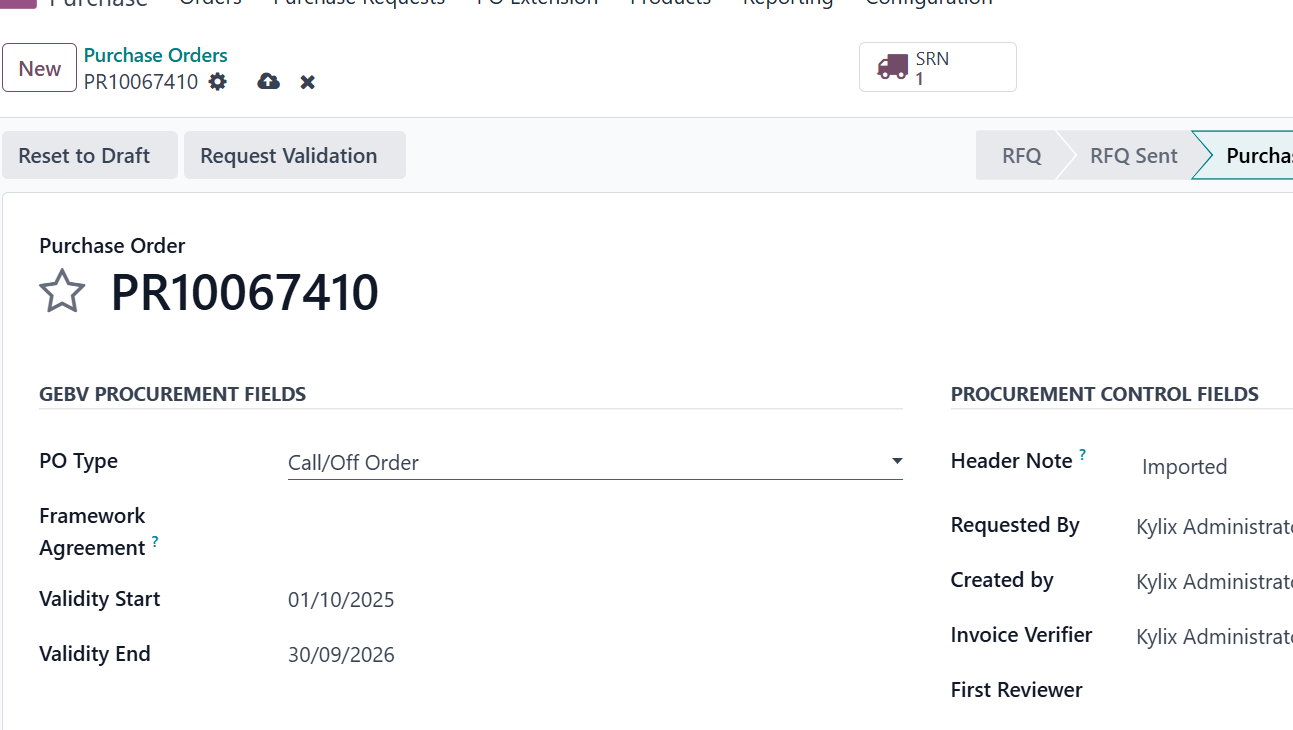
● The Framework Agreement field appears, select the parent agreement
Note: Only confirmed Framework Agreements for the same vendor appear in the dropdown. If the expected agreement is not listed, check that it is confirmed and that the vendor matches. |
Step 2 — Add Lines and Submit
● Add the required lines as normal
● Click Purchase Request — if the Call-Off value already exceeds the framework remaining balance, you will be blocked here with a clear error message showing the available balance
● Complete tier validation as normal
Step 3 — Confirm
● On confirmation the system performs a final balance check
● If the balance is sufficient the PO is confirmed and receives a 45-series reference number (e.g. 4500000001)
● If another Call-Off was confirmed in the meantime and consumed the remaining balance, you will be blocked with an error message
Note: The Framework Agreement field is mandatory. A Call-Off Order cannot be confirmed without one. |
How Balance Enforcement Works
The system checks the framework balance at two points:
Check Point | What Happens |
When you select the Framework Agreement | Immediate block if the Call-Off value already exceeds the remaining balance. You are shown the agreement value, consumed amount, and remaining balance. |
When the releaser confirms the PR | A final server-side check. Catches cases where two Call-Off Orders were in the approval queue at the same time and one was confirmed first. |
Both checks produce the same error message format:
Information Shown | Example |
Framework Agreement reference | 4700000001 |
Agreement Value | KES 1,000,000.00 |
Already Consumed | KES 800,000.00 |
Remaining Balance | KES 200,000.00 |
Balance Consumption Rules
The Consumed Amount on the Framework Agreement reflects real committed or spent value, not just paper commitments. The rules below determine how much each Call-Off consumes depending on its state.
Call-Off State | Billed Amount | Consumed from Framework |
Purchase / Done (active) | Any | Full tax-inclusive PO value |
Expired | Nothing billed | Zero, full value released back |
Expired | Partially billed | Billed amount only; unbilled portion released |
Expired | Fully billed | Full billed amount, nothing released |
Extension approved (restored to active) | Any | Full tax-inclusive PO value again |
Topping Up
Topping Up a Framework Agreement
If the framework ceiling needs to be increased, raise a top-up PR against the Framework Agreement using the standard top-up flow (Request Type = Top Up, PO to Top-Up = the Framework Agreement).
On confirmation the new lines are added to the Framework Agreement, increasing its Agreement Value and Remaining Amount immediately.
Topping Up a Call-Off Order
A top-up PR can be raised against an existing Call-Off Order in the normal way. The top-up value is checked against the framework remaining balance — not just the Call-Off itself.
Note: You cannot bypass the framework ceiling by topping up an existing Call-Off Order. The top-up is blocked if it would push the total consumed amount above the framework ceiling. |
Quick Reference — Sequence Numbers
PO Type | Reference Series |
Framework Agreement Order | 47-series (e.g. 4700000001) |
Call/Off Order | 45-series (e.g. 4500000001) |
How to archive a vendor
1.Log in to the system with access to contact
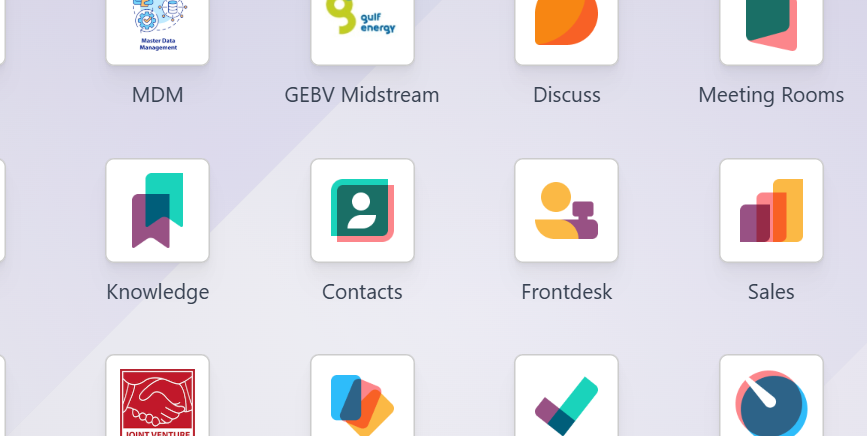
2. Search the contact.
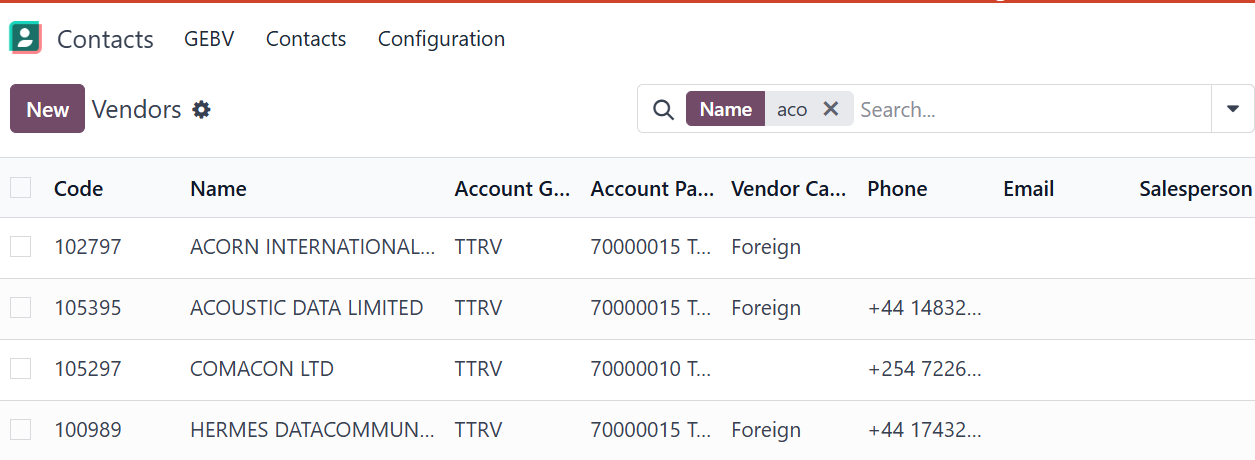
3.Open the contact.
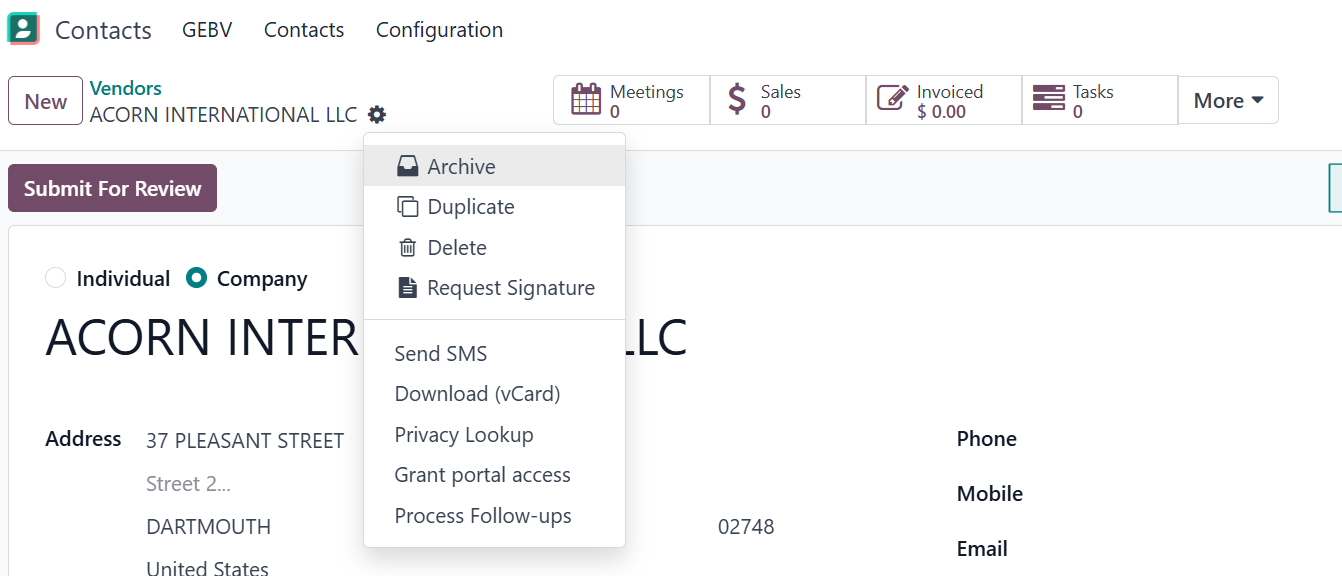
4.Click on the settings icon on your upper Left.
5.Click archive.
Gulf Energy Procurement
Document Sign-Off
| Role | Name | Date |
| Prepared By | Martha Ondigi | 15/05/2026 |
| Reviewed By | Joseph Okech | 15/05/2026 |
| Approved By | ||
| Authorized By |