Inventory Management
Document Sign-Off
|
Role |
Name |
Date |
|
Prepared By |
Martha Ondigi |
15/05/2026 |
|
Reviewed By |
Joseph Oketch |
15/05/2026 |
|
Edited By |
Sharon Chemutai |
09/10/2026 |
|
Reviewed By |
||
|
Approved By |
||
|
Authorized By |
Document Revision
Version | Date | Section | Summary of Changes | Author |
1.0 | 15.05.2026 | All Sections | Document Creation | Martha Ondigi |
1.1 | 14.10.2026 | Section 3-8 |
| Sharon Chemutai |
1. Inventory Structure
This structure enables users to identify where inventory is held and how materials are organized within the respective warehouses.
Inventory Overview
The hierarchy is organized from the Plant level down to the individual storage bins, with each level representing a more specific inventory location.
The location hierarchy follows this structure:
Stock Location → Storage Location →Storage Bin.
A Stock Location serves as the main location, containing multiple Storage Locations. Each Storage Location can, in turn, contain multiple Storage Bins for more detailed organization and tracking of materials.
The diagram below shows the relationship between the plant/warehouse, stock location, storage location and storage bin in the Odoo instance:

As shown in the diagram above, there is an example of Plant/Warehouse KE15, followed by the stock location KE15/Stock, the storage location KE15/Stock/5000 test storage and finally the storage bin KE15/Stock/5000 test storage/Container A, from this inventory is easily located within the system.
A. Plants
| Plant | Name | JV | Nature | Default WBS | Default Cost Centre |
| KE00 | Corporate Office | CKE02 | Warehouse | KE02800000 | |
| KE01 | JV1 Operational Warehouse | OKE04 | Warehouse | O.KE040Z.00INV.T01 | |
| KE02 | JV1 Other Warehouse | OKE04 | Well | O.KE040Z.00INV.T01 | |
| KE03 | JV2 Operational Warehouse | OKE05 | Warehouse | O.KE050Z.00INV.T01 | |
| KE04 | JV2 Other Warehouse | OKE05 | Well | O.KE050Z.00INV.T01 | |
| KE05 | JV3 Operational Warehouse | OKE06 | Warehouse | O.KE060Z.00INV.T01 | |
| KE06 | JV3 Other Warehouse | OKE06 | Well | O.KE060Z.00INV.T01 | |
| KE07 | JV4 Operational Warehouse | OKE07 | Warehouse | O.KE070Z.00INV.T01 | |
| KE08 | JV4 Other Warehouse | OKE07 | Well | O.KE070Z.00INV.T01 | |
| KE09 | JV5 Operational Warehouse | OKE08 | Warehouse | O.KE080Z.00INV.T01 | |
| KE10 | JV5 Other Warehouse | OKE08 | Well | O.KE080Z.00INV.T01 | |
| KE11 | JV6 Operational Warehouse | OKE09 | Warehouse | O.KE090Z.00INV.T01 | |
| KE12 | JV6 Other Warehouse | OKE09 | Well | O.KE090Z.00INV.T01 | |
| KE13 | JV7 Operational Warehouse | OKE10 | Warehouse | O.KE100Z.00INV.T01 | |
| KE14 | JV7 Other Warehouse | OKE10 | Well | O.KE100Z.00INV.T01 | |
| KE15 | JV8 Operational Warehouse | OKE11 | Warehose | O.KE110Z.00INV.T01 | |
| KE16 | JV8 Other Warehouse | OKE11 | Well | O.KE110Z.00INV.T01 |
B. Storage Locations
| Warehouse | Storage location | Description of Storage Location |
| KE03, KE05, KE07,KE09, KE11, KE13 | 2000 | Kapese Base |
| KE03, KE05, KE07, KE11 | 9200 | Kapese PLD |
| KE03, KE05, KE07, KE11, KE13 | 9100 | Kapese Repairs |
| KE03, KE05, KE11 | 9900 | Kapese Redeploy |
| KE06 | 8001 | Well Services |
| KE03, KE05, KE07, KE11, KE13 | 9100 | Hkapese Repairs |
| KE13 | 9000 | EOPS GIT |
| KE06 | 8001 | Amosing 1 |
| KE06 | 8001 | Amosing 2 |
| KE06 | 8001 | Ngamia Warehouse |
C. Storage Bins
| Storage Location: Amosing 1 |
| Pad 1 |
| Pad 2 |
| Pad 3 |
| Pad 4 |
| Storage location: Amosing 2 |
| Pad 1 |
| Pad 2 |
| Pad 3 |
| Pad 4 |
| Storage location: Amosing 2 |
| Pad 1 |
| Pad 2 |
| Pad 3 |
| Pad 4 |
2. Creation of requisition
How to create a new RFQ
Log in to the ERP system with a user account that has access to the Inventory module. Navigate to and click on the Inventory module.

2. Open Purchase module and click 'New'
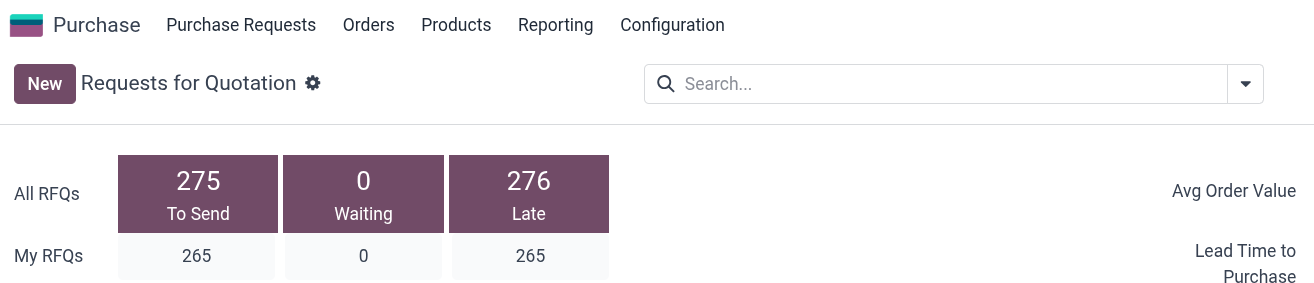
3. This opens the create new RFQ, with the required field being the vendor's name and additional fields as follows:
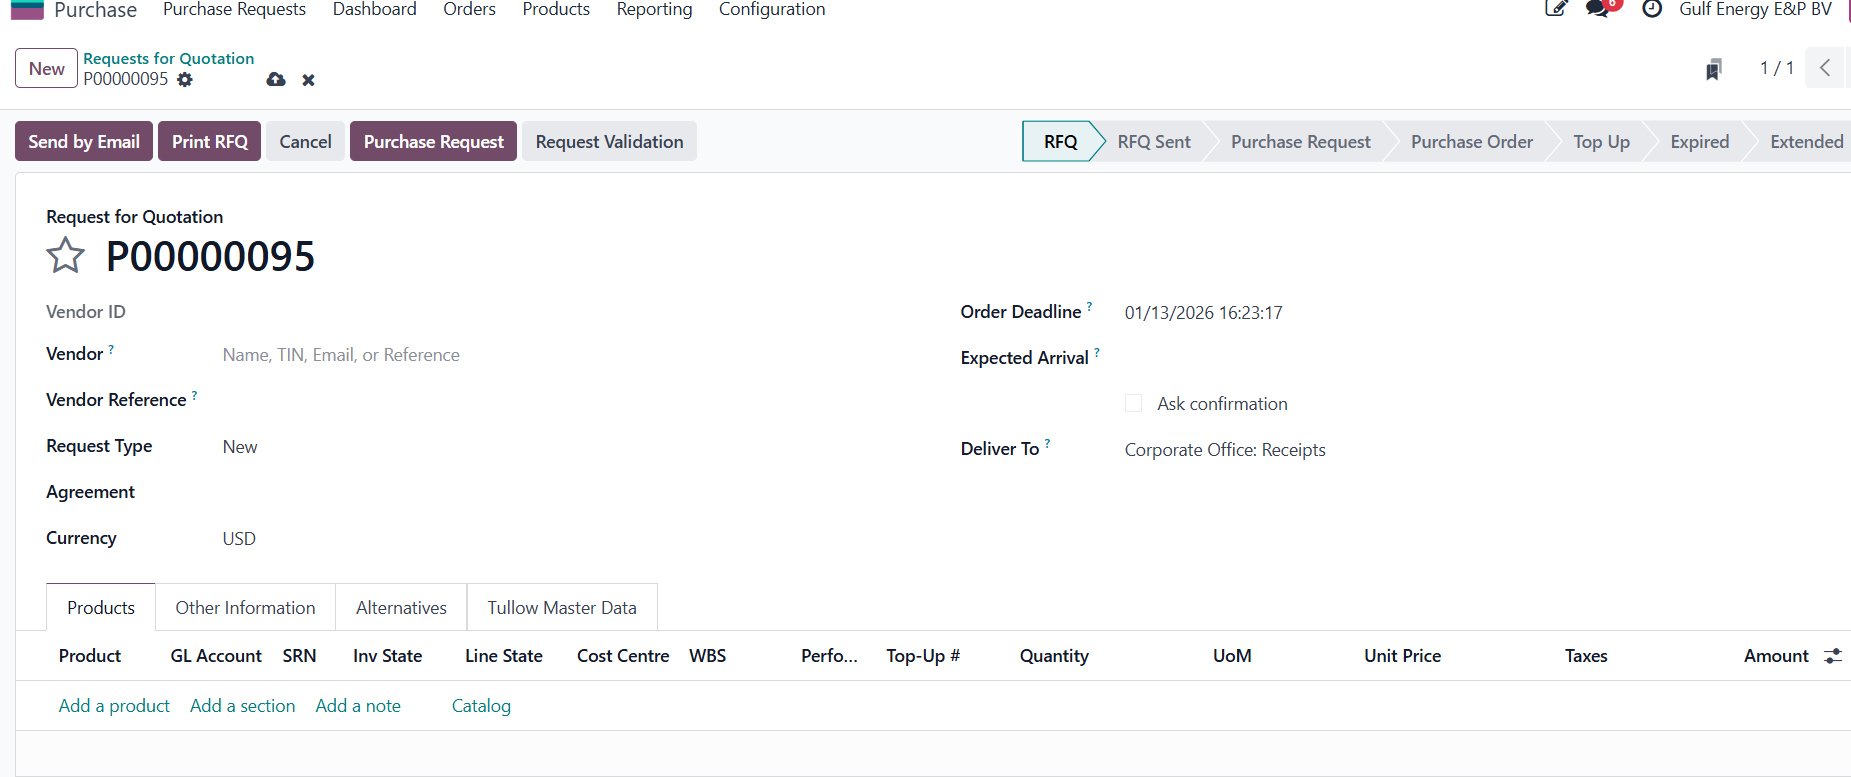
- Vendor Name: Select vendor name from the drop down, this automatically fills the vendor ID from the system
- Order Deadline: The system will always have this as current date and time but this can be changed to any desired date and time
- Expected Arrival: This is the date and time that you expect the vendor to deliver the goods or services - leave blank for system to automate based on past delivery times of the vendor.
- Vendor Reference: Input the reference from the vendor if available else leave this blank
- Request type Must be New Used when this is a first-time request, no previous order, contract or budget exists
- Agreement: If there exists a Purchase agreement with the vendor for blanket orders this can be selected here
- Deliver To: Should be the warehouse where delivery will be done to, by default is the Corporate Office Receipts
- Currency is the currency of the order, default is the company currency which is USD
4. Click on the 'Add a product' link to populate the products of the RFQ.
How to create a top-up RFQ.
- Log in to the ERP system with a user account that has access to the Purchase module. Navigate to and click on the Purchase module.
2. Open Purchase module and click 'New'
3. This opens the create new RFQ, with the required field being the vendor's name and additional fields as follows: 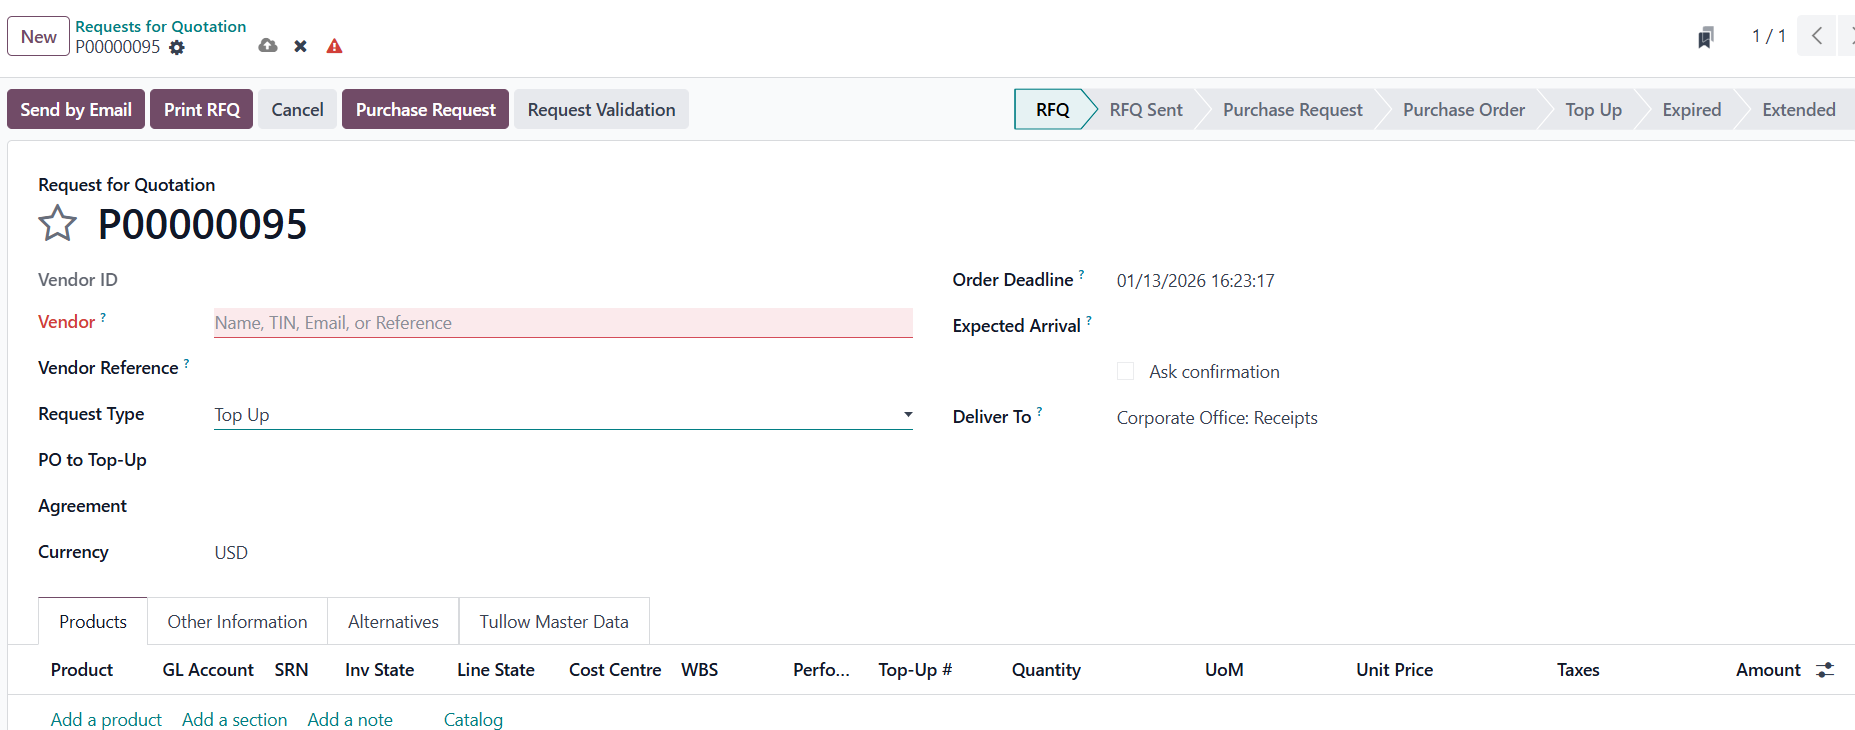
- Vendor Name: Select vendor name from the drop down, this automatically fills the vendor ID from the system
- Order Deadline: The system will always have this as current date and time but this can be changed to any desired date and time
- Expected Arrival: This is the date and time that you expect the vendor to deliver the goods, or services - leave blank for system to automate based on past delivery times of the vendor.
- Vendor Reference: Input the reference from the vendor if available else leave this blank
- Request type Must be Top-up-Used when you are adding more to an existing approved request. The original request already exists, but the amount/quantity is not enough. Example: Increasing quantity from 10 to 15 items, Adding extra funds to an existing budget line.
- PO to Top-Up-Input or select the PO number to be affected.
- Agreement: If there exists a Purchase agreement with the vendor for blanket orders this can be selected here.
- Deliver To: Should be the warehouse where delivery will be done to, by default is the Corporate Office Receipts
- Currency is the currency of the order; default is the company currency which is USD
4. Click on the 'Add a product' link to populate the products of the RFQ.
How to create an extension RFQ
- Log in to the ERP system with a user account that has access to the Purchase module. Navigate to and click on the Purchase module.

- Open Purchase module and click 'New'
- This opens the Create New RFQ, with the required field being the vendor's name and additional fields as follows:
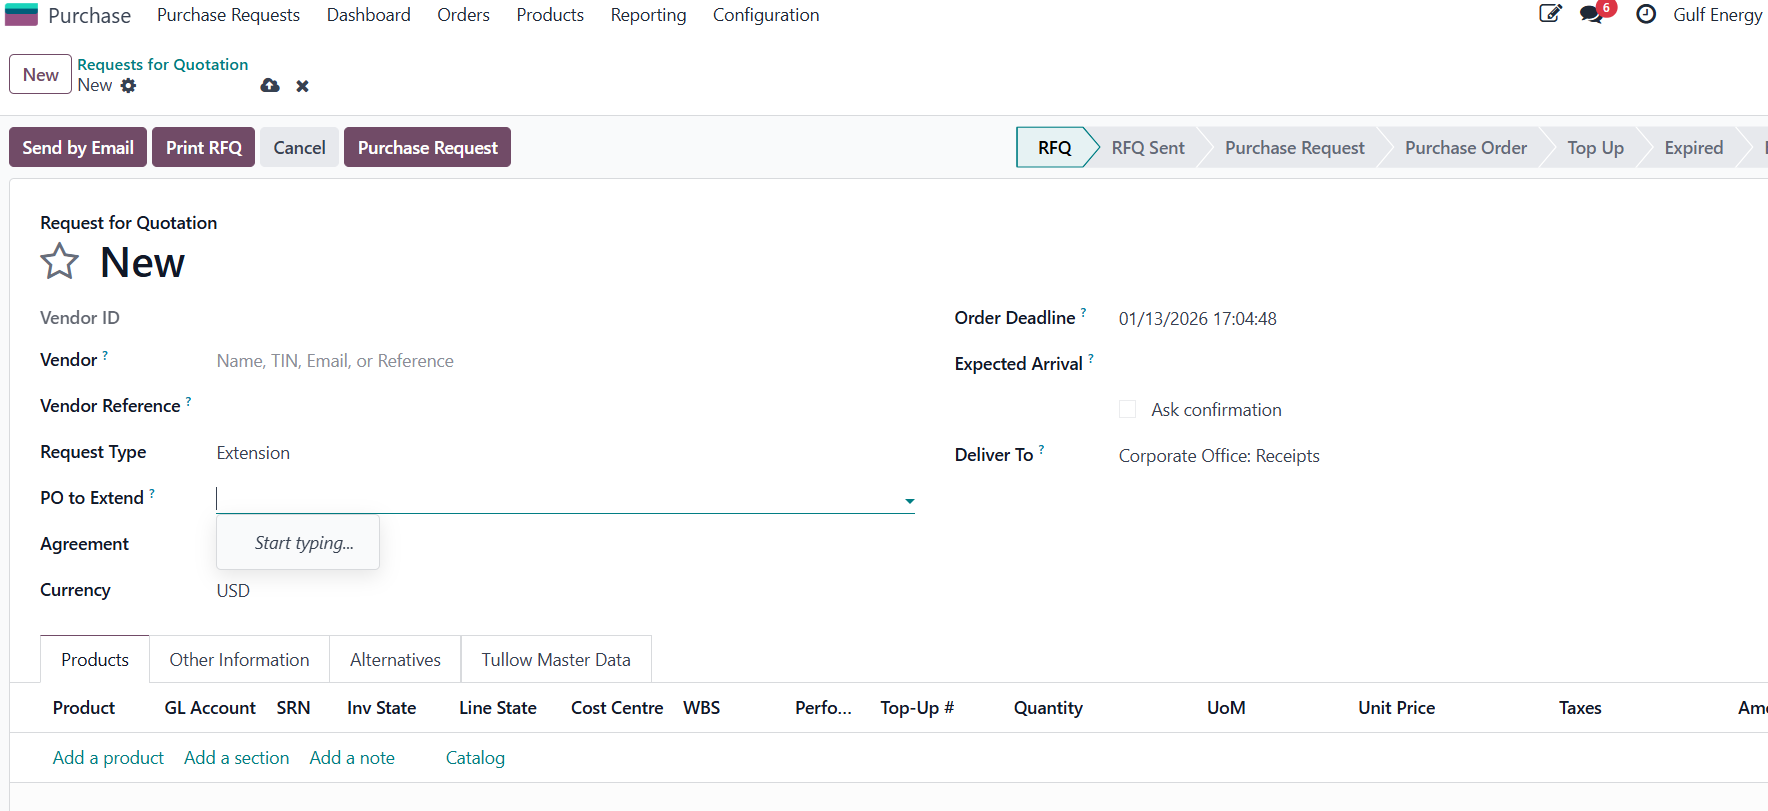
a).Vendor Name: Select vendor name from the drop down, this automatically fills the vendor ID from the system
b). Order Deadline: The system will always have this as current date and time but this can be changed to any desired date and time
c). Expected Arrival: This is the date and time that you expect the vendor to deliver the goods, or services - leave blank for system to automate based on past delivery times of the vendor.
d). Vendor Reference: Input the reference from the vendor if available else leave this blank.
e). Request type Must be Extension-Used when you are extending the duration of an existing request or contract. No change (or minimal change) in quantity or amount just time Example: Extending a service contract for 3 more months, Renewing a lease or maintenance agreement.
f). Extension PO- Input/select a PO that must be affected.
g). Agreement: If there exists a Purchase agreement with the vendor for blanket orders this can be selected here.
h). Deliver To: Should be the warehouse where delivery will be done to, by default is the Corporate Office Receipts.
I). Currency is the currency of the order; default is the company currency which is USD.
4. Click on the 'Add a product' link to populate the products of the RFQ.
How to send an RFQ to vendor.
1.Log in to the ERP system with a user account that has access to the Purchase module. Navigate to and click on the Purchase module.
2.Under purchase Requests. Select Request Quotation. 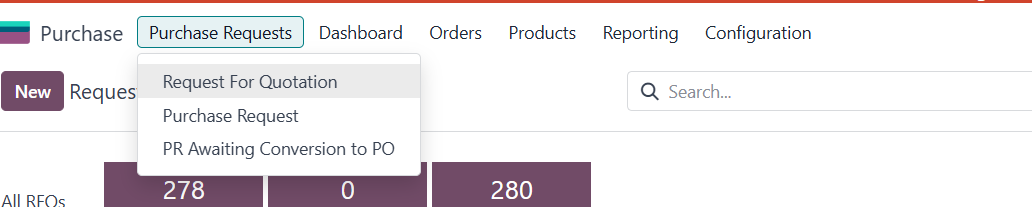
3.Filter to RFQs
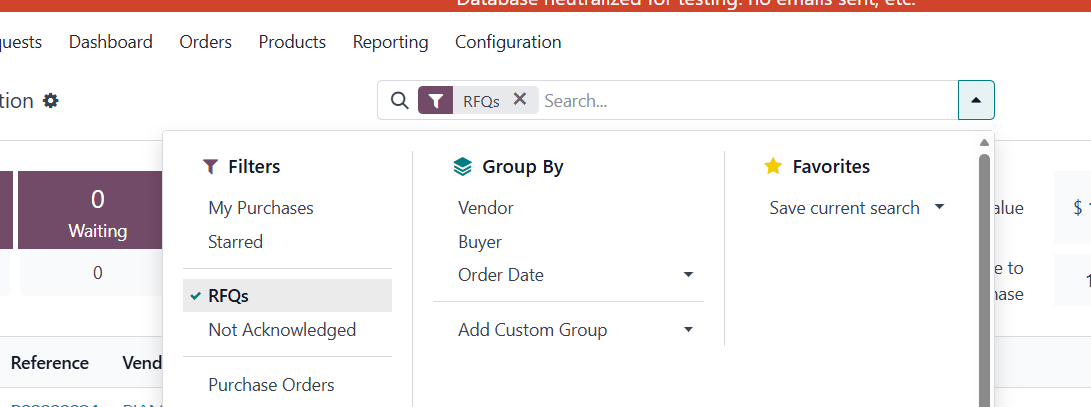
4.Select/Search from the list of RFQs the required RFQ to be sent and open it.
5.Click on 'Send by Email'.
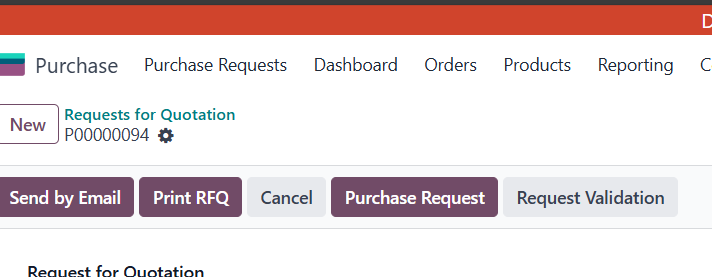
6.After clicking 'Send by Email', the following page pops up with the fields as follows:
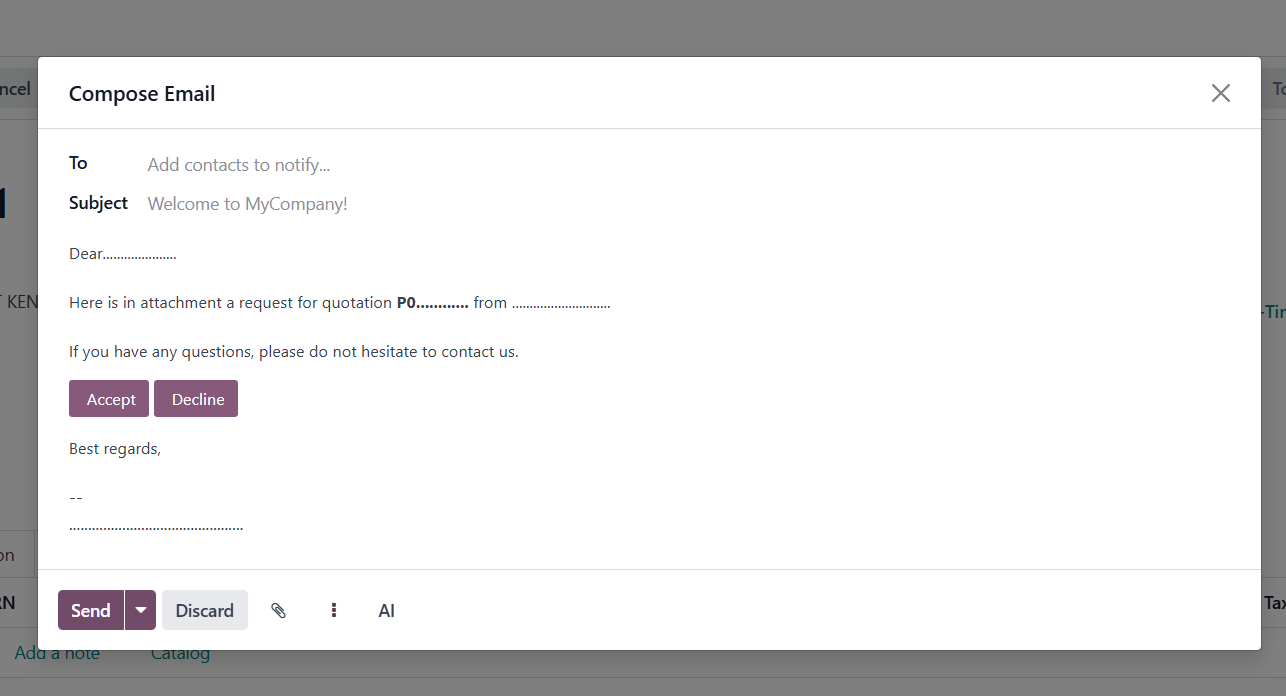
- To: This is where you select the recipient. You can add multiple contacts from your database or type in a new email address.
- Subject: The title of your email as it will appear in the recipient's inbox. Odoo often pre-fills this based on the document you are sending (e.g., "Welcome to My Company!").
- Message Body: The main area where you write your message. It currently shows a template for a Request for Quotation (RFQ), including dynamic placeholders like "P0..." for the order number.
- Accept / Decline Buttons: These are call-to-action buttons embedded in the email that allow the vendor to respond directly via the Odoo portal.
Icons
-Send: Finalizes and emails the message to the recipients.
-Attachment: Found in the main record view (behind the popup). It allows you to attach physical files, like a scanned copy of a bank receipt or a PDF of the bill.
-Templates: Click this to switch between different pre-written email templates.
- Discard: Closes the window without saving or sending the draft.
3. Creation of PO.
How to convert an RFQ to PR.
- Log in to the ERP system with a user account that has access to the Purchase module. Navigate to and click on the Purchase module.
- Under purchase Requests. Select Request Quotation.
- Select/search the RFQ you want to convert to a PR
- Click on purchase request.
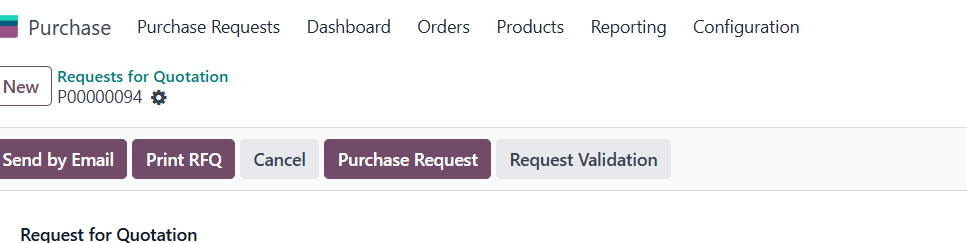
5. This opens the PR with the required field being the PO and additional fields as follows:
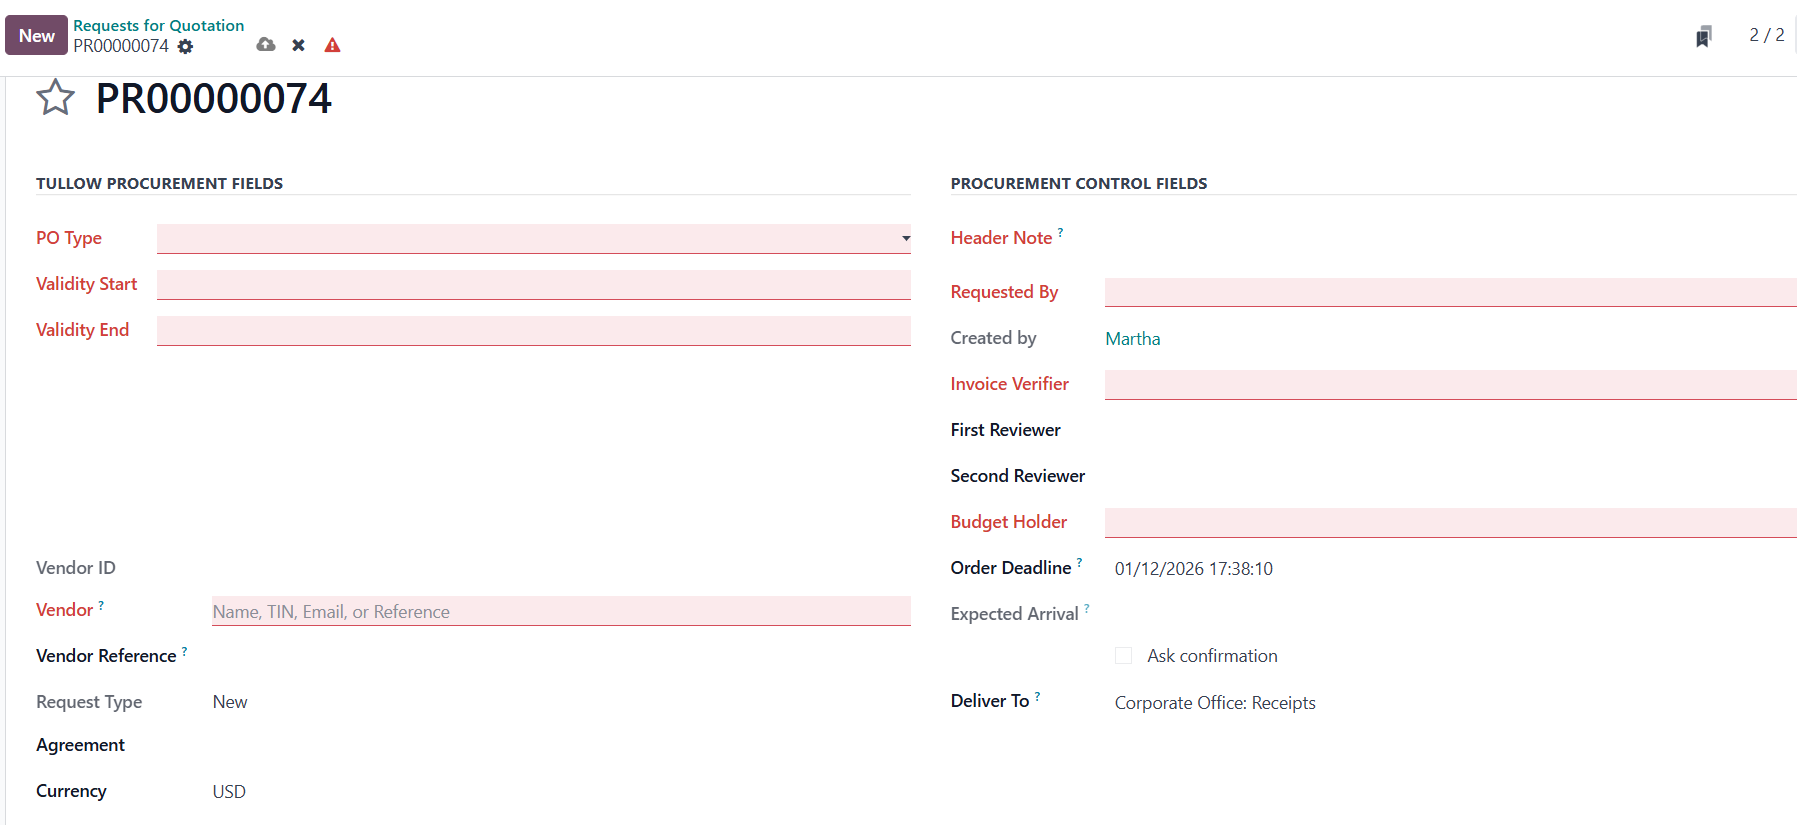
a). PO Type: indicates the nature of the purchase. e.g. Goods Purchase Order. And determine applicable workflows, stock handling, and accounting treatment.
b). Validity Start: Date from which the quotation or request becomes valid. Before this date, the RFQ cannot be confirmed. It helps control when a supplier quotation is acceptable.
c). Validity end: Expiry date of the request. If the RFQ is not confirmed before this date, Odoo can prevent confirmation or require a new RFQ.
d). Vendor ID: Internal system identifier for the supplier. It ensures all purchases, bills, and payments are correctly linked to the same vend
e). Vendor: Name of the supplier being requested or evaluated.
f). Request type: Indicates whether the request is: New – first-time purchase or Replacement / Amendment – modifying an earlier request.
g). Agreement: Links the RFQ to a Purchase Agreement / Call for Tender. Once selected, Odoo automatically loads:
Vendor pricing
Payment terms
Vendor currency
Vendor taxes (if configured)
h). Currency: Currency in which the vendor will quote. Odoo automatically handles currency conversion for accounting and reporting.
i). Header Note: General instructions or comments. The note can be printed on the RFQ or Purchase Order sent to the vendor.
j) Requested by: Person who initiated the purchase request
k). Created by: User who physically created the document in Odoo. Odoo uses this for traceability and approval routing.
l). Invoice Verifier: Person responsible for verifying the vendor invoice. This person is responsible for checking the vendor invoice against: The Purchase Order, Delivered Quantities, agreed prices. Odoo may require their approval before payment is processed.
m). First Reviewer: First level approval authority
n). Second Reviewer: Second approval level (usually management or finance)
o) Budget Holder: Person responsible for the budget being used
p). Order Deadline: Latest date the order must be confirmed
q). Expected Arrival: Expected delivery date of goods
r). On-Time Delivery: Vendor performance indicator
s). Ask confirmation: If checked, vendor must confirm the order, Ensures commitment before fulfillment
t). Delivery To: Physical delivery location. This specifies where goods or services should be delivered.
Odoo uses this to determine: The warehouse, Stock location, Delivery documentation
u). Then proceed to validation.
How to convert a PR to a PO
- Log in to the ERP system with a user account that has access to the Purchase module. Navigate to and click on the Purchase module.
2. Navigate to Purchase Request and Select PR Awaiting Conversion to PO.
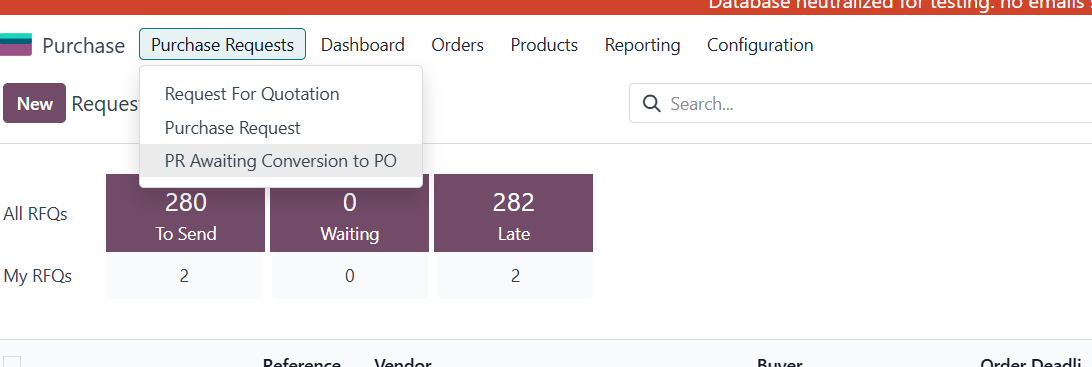
3.Open the PR to be converted to a PO.
4.Once you've opened the PR, click on confirm order. 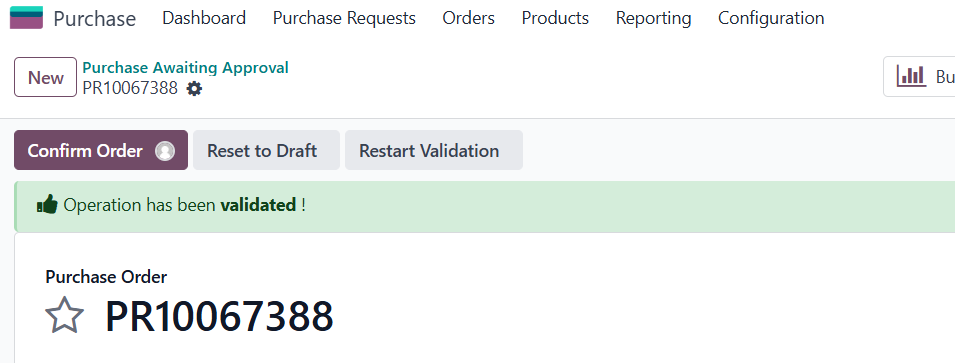
5.Once it is Confirmed, it automatically sets to PO.
6.Under Purchase >orders>purchase orders is where you'll find the PO That you've converted.
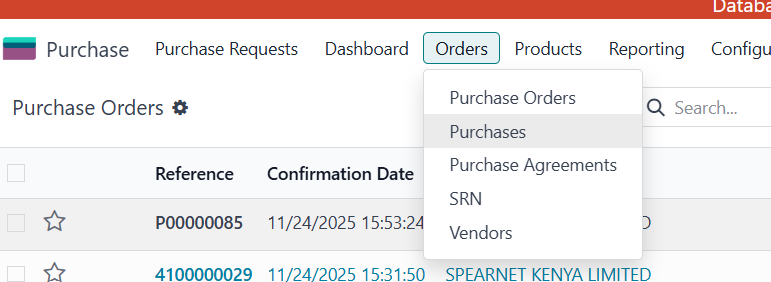
7.Click your PO to open it.
4. Receipt of goods into the system
Procedure:
- Configure the Product Categories
- Configure the product's accounting properties.
- Confirm the Purchase Order.
- Validate the goods receipt.
- Review the generated inventory valuation entries
1.) Configure the product categories
Navigate to: Inventory >Configuration>Product Categories>New

Enter the category then select the parent category as shown in the figure below:

2.) Configuration of the product's accounting properties
When goods are received from the supplier, Odoo updates the inventory. We are using Automatic accounting for our valuation entries (Automated Inventory Valuation) and one needs to configure the specific accounts to be tagged when generating these entries.
The accounts are configured in two places:
a.) Product category
Navigate to: Inventory >Configuration>Product Categories>Materials
Figure below shows the page where the fields are configured: They determine how Odoo calculates inventory value and connects stock movements to accounting.

Fields population:
a.) Category-The name of the product group, in this case, Materials. Groups related products.
b.) Parent Category-The category above Materials, currently All. Organizes categories into a hierarchy.
c.) Routes-Defines how products are supplied or moved, such as purchasing from a vendor.
d.) Force Removal Strategy-Determines which stock is picked first when goods leave a location.
e.) Price Difference Account-Account for differences between expected and actual costs.
f.) Income Account-Account for sales income
g.) Expense Account-Account for recording expenses
h.) Downpayment Account-Account for advance payments
i.) Costing Method-Standard Price-Values inventory using a predefined standard cost
j.) Inventory Valuation-Automated-Automatically generates accounting entries for qualifying inventory movements.
k.) Stock Valuation Account ( 65100010 Operated Materials)-Records the financial value of inventory.
l.) Stock Journal (Inventory Valuation)-Specifies the journal used for applicable inventory valuation entries.
m.) Stock Input Account (70103010 GR/IR Clearing - Goods/Materials)-This will account for incoming stock and reconciliation with supplier bills.
n.) Stock Output Account (20300040 Stock Count Differences)-Supports outgoing stock accounting.
o.) Production Account-This field is for production-related accounting.
b.) Product Form
Navigate to: Inventory > Products > Products > Select a product or
Navigate to: Inventory > Configuration > Product Categories > Materials > Products (It is on the upper right) > Select product from the list
Open the product and check its accounting properties, including the Expense Account. For example, the product below called 'Test Issue to well' belongs to the Materials category but it has its own configured Expense Account.
This is illustrated in the figures below:

Note: An expense account has to be specified on the Accounting tab on the field Well Issue Expense Account. This is the account that shall be debited when generating the accounting entries.

3.) Confirming the purchase order
Navigate to Purchase → Orders → Purchase Orders and open the Purchase Order you want to process. Verify the vendor, products, quantities, prices, taxes, delivery date and product category, then ensure the Inventory (Stock) field is checked to initiate the receipt of goods then select the destination Plant. Confirm the purchase order which reveals a Receive Products button to initiate the receipt of goods into the Inventory.
4.) Validating the Goods Receipt
Once you click the Receive Products button, a receipt with ready status will then be available for validation. See below sample image of a receipt.

The user validating should check the received quantities, Check the product, quantity received and source and destination locations.
The user validating should also specify the Storage Location and Storage bin that the received products are going to sit at on the Plant. More information on the WBS and Conditions can also be set on the operations tab lines.
Click Validate
After entry of comment, receipt is validated and a confirmation message above it is received as shown in the figure below:
See a sample of the generated Entry below:

For example in our journal entry above debit and credit is as in the following table:
What is recorded in the Odoo Instance | Debit | Credit |
Stock Input Account 65100010 | USD 100 | - |
Stock Interim Account 70103010 GR/IR Clearing - Goods/Materials | - | USD 100 |
Total | USD 100 | USD 100 |
5. Issuing an inventory item into the wells.
A. Internal Transfer
1. Log in to the ERP system with a user account that has access to the Inventory module. Navigate to and click on the Inventory module.
2. click on Operations > Internal and click New.

3. Issuing Inventory to Wells (Internal Transfer)
This process moves material from your main stock to a specific well site where they get consumed as shown in the figure below:

Source Location: Where the items are currently stored, Select the warehouse which is the main warehouse, for example: KE02/Stock
Destination Location: Where the item(s) need to go, Select the receiving warehouse which is the well. All wells get a consumption location called consumption for example: KE02/Consumption.
B. Adding the Inventory Item
- Add a Line: Click Add a line in the Operations tab
- Product: Select the material being transferred
Condition: In the Condition column, manually select or type the condition code for the material
WBS: Work Breakdown Structure, select the relevant WBS code
- Demand: Enter the quantity required for the well operation.
- Units: Select the relevant unit of measurement for the material
Above steps are shown in the sample screenshot below:
C. Execution (Validating the Issue)
- Mark as Todo: Click Mark as Todo to move the document from Draft to Waiting/Ready status.
- Check Availability: Odoo will confirm the items (in the specific condition requested) are physically in the Source Location. Note: Check stock availability, one should not assume that the requested quantity is physically available just because it was entered in the demand field.
Validate: Once the physical items are picked and sent to the well, click Validate. This confirms the stock movement and updates the inventory.
- For example: As 3 item was transferred
- KE02/Stock: 10 items
- KE02/Consumption: 0 item
- KE02/Stock: 7 item
- KE02/Cosumption: 3 items
Before validation:
After successfully validating the transfer:
Navigate to: Accounting> Accounting>Journal Entries
Search for the reference associated with the goods issue to Wells, for example the one shown in the figure below:

6. Returning of inventory items into stock or supplier
A. Returning items that were moved from one JV to another
- Log in to the ERP system with a user account that has access to the Inventory module. Navigate to and click on the Inventory module.
2. click on Operations > Internal and locate the record you need to make a return on.

3. Locate the original Internal Transfer and click the Return button at the top left of the screen.

4. Input the quantity of items you intend to return or if you wish to return all the items click on the Return All button

B. Returning items that were received from a Supplier
- Log in to the ERP system with a user account that has access to the Inventory module. Navigate to and click on the Inventory module.
2. click on Operations > Internal and locate the receipt.
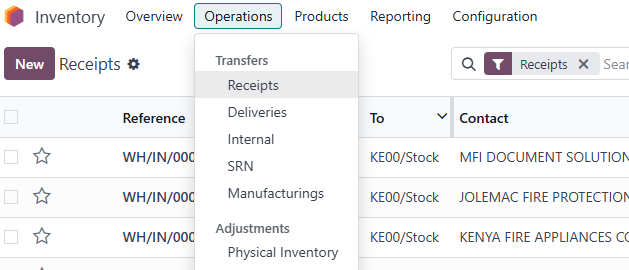
3. Locate the original Receipt and click the Return button at the top left of the screen.

4.Input the quantity of items you intend to return or if you wish to return all the items click on the Return All button or if you wish to return the goods for exchange, click on the Return for Exchange button

7. Transfer of inventory materials from one JV to another.
Log in to the ERP system with a user account that has access to the Inventory module. Navigate to and click on the Inventory module.
Click Operations > Transfers and select New.

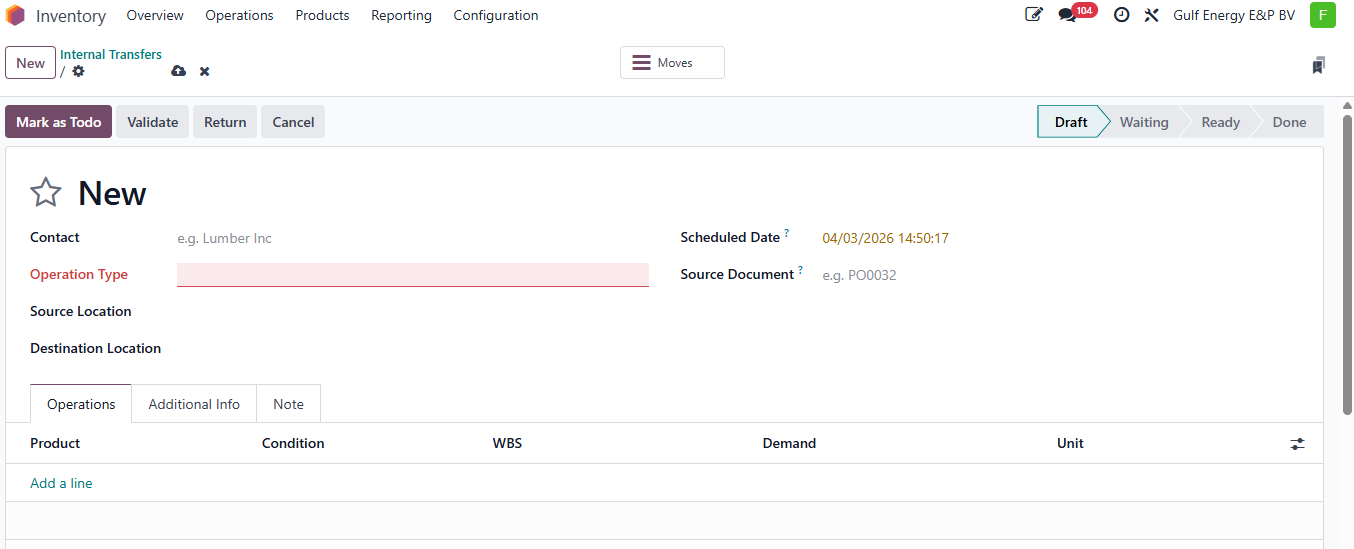
Operation Type: Ensure Internal Transfers is selected. This allows for direct movement between your various internal JV locations.
- Source Location: Select the JV warehouse or location where the items currently reside (e.g., JV1/Stock).
- Destination Location: Select the receiving JV location (e.g., JV2/Stock).
Source Document: Enter a reference for the transfer (e.g., "JV-X to JV-Y Transfer" or a specific project ID) to assist Finance with cross-JV reporting.
- Add a Line: Select the material being transferred.
- Condition: In the Condition column, specify the current technical state.
Detailed Operations: If the item is tracked by click the "Detailed Operations" icon (the three-line icon on the far right) to select the exact lot associated with that JV and condition.
- Mark as Todo: This changes the status from Draft to Ready.
- Check Availability: Odoo will confirm the items are present in the source JV location.
- Validate: Click Validate once the physical move is confirmed.
D. Validation
8. Inventory count
Navigate to Inventory > Operations > Physical Inventory.
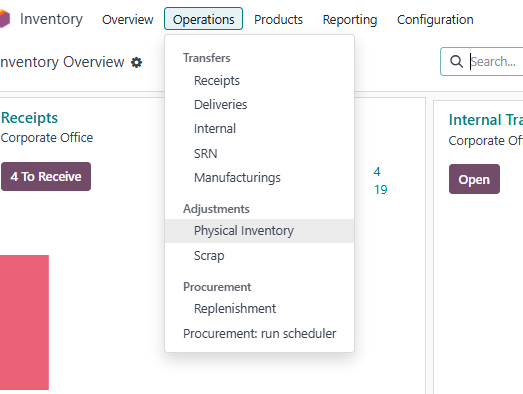
Select the items to be counted. Click Request a Count.
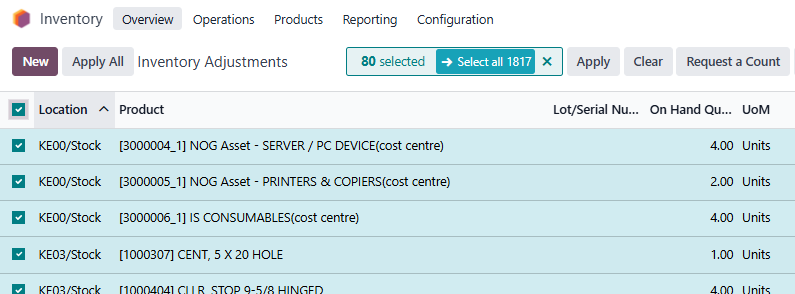
In the pop-up, ensure you select "Leave Empty" for the Counted Quantity field. This ensures the record shows "0" or "null" so staff must manually input the physical figure.

Once the physical count is complete, the user returns to this screen and types the number into the Counted Quantity column.
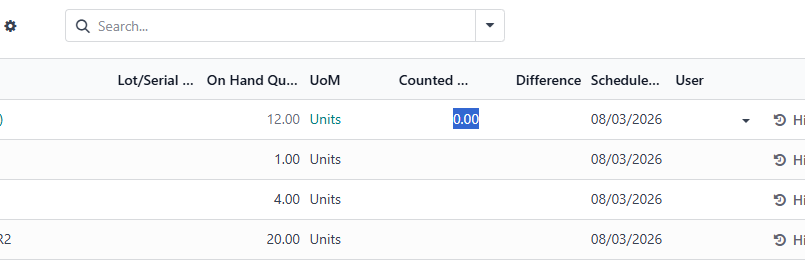
Click Apply. Odoo will automatically create a stock move to reconcile the "On Hand" quantity with the "Counted" quantity.

9. Inventory reporting.
Log in to the ERP system with a user account that has access to the Inventory module. Navigate to and click on the Inventory module.
Stock Report
- Navigate to Inventory > Reporting > Stock

- On Hand: The actual physical quantity currently at the location.
- Free to Use: The quantity available for new operations (Total On Hand minus items already reserved for pending Well Issues).
- Use the "Group By > material number" feature to view sub-totals of stock for each specific JV or Well Site.
Inventory Warehouse Report
Log in to the ERP system with a user account that has access to the Inventory module. Navigate to and click on the Inventory module.
Navigate to Inventory > Reporting > Inventory Warehouse Report

- Open the report, select the relevant plant or use the available filters. Identify the column relevant to the information you want to check. Locate the relevant record and review its displayed value then compare the information with the relevant stock or transaction records.
You can filter or group by from the following list as shown in the figure below:

- For example: Narrow down the inventory warehouse report information by applying the filters as shown in the figure below, then click on the relevant plant you would like to review its information:

Stock by Type
Log in to the ERP system with a user account that has access to the Inventory module. Navigate to and click on the Inventory module.
- Navigate to Inventory > Reporting > Stock by Type

- Click the small arrow beside a plant, such as JV1 Operational Warehouse, to view its stock-type grouping. Expand the next arrow beside Unrestricted Use to inspect the underlying records. This is as shown in the figure below:

- Check the quantity and value: Compare the displayed quantity and value with the expected inventory records. If something looks incorrect, investigate the related stock movements and valuation records. The figure below shows sample plants with their quantities and values:

Locations Report
Log in to the ERP system with a user account that has access to the Inventory module. Navigate to and click on the Inventory module.
- Navigate to Inventory > Reporting > Locations

- Stock By grouping by Location, you can see a folder for each JV showing the total materials they are responsible for.
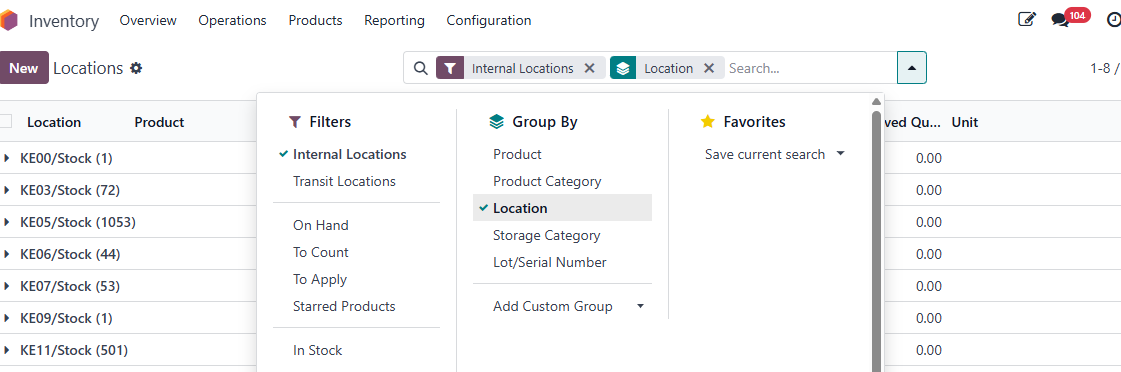
- Inventory at Date: Click the "Inventory at Date" button to view what was physically present at a Well Site on a specific past date (essential for month-end audits).
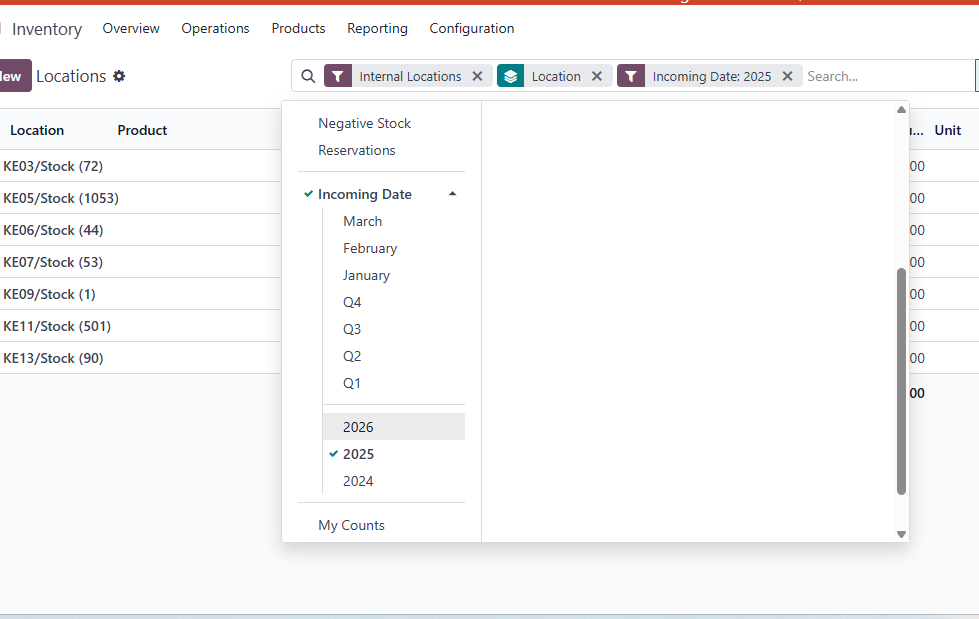
- Change to pivot
- The measures are there you can add any field you would like to include in the report.
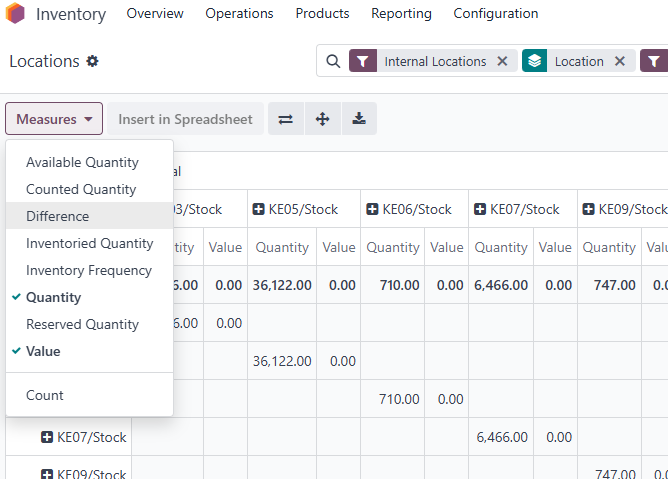
- Download using the download icon
Moves History (The Audit Trail)
- Navigate to Inventory > Reporting > Moves History.

- Search for the product or transfer reference, apply the relevant date filter, review the quantity, source location, destination location and status then open the related transfer to confirm the operation for example for the transfer reference-KE02/WELL/ISSUE/00007, the audit trail info is as shown in the figure below:

- Each entry records the Date, Source Location, Destination Location, and the user who validated the move.
- Verify that the correct quantity was issued from the intended source and that the operation is complete.
Moves Analysis
Log in to the ERP system with a user account that has access to the Inventory module. Navigate to and click on the Inventory module.
- To analyze stock movements over a selected period and identify movement patterns, unusual quantities or changes in inventory activity, navigate to Inventory > Reporting > Moves Analysis

- Use the search bar and available filters to select the date range you want to investigate, use the available Group By options to organize records by a relevant field, such as product and status. Switch between list, pivot, or graph views. Compare the movement figures across products. The is as shown in the sample figures below:


- If a product shows unexpected movement activity, open Moves History and inspect the individual stock movements supporting the analysis.
Inventory Valuation
Log in to the ERP system with a user account that has access to the Inventory module. Navigate to and click on the Inventory module.
- Navigation to Inventory > Reporting > Inventory Valuation

- Use the search bar to find the product or apply filters for the relevant product, date, or reference as shown in the sample figure below:

- Inspect the fields available in your report, such as product, quantity, unit cost, total value, date, or reference. Check that the record corresponds to the stock movement being investigated, one of the entries is as shown in the figure below after application of filters:

- Compare with the stock movement: Open the related transfer or goods issue. Confirm the product and quantity and compare them with the valuation record. Check that the value change is consistent with the applicable costing method.
- Check the accounting entry: Open the related accounting entry through the valuation record or the Accounting application. Confirm the journal, accounts, debit and credit amounts, and posting status where available.